0%

minio搭建图床

minio部署见docker脚本

1
2
3
4
5
6
7
8
9
10
11
12
13
14
15
16
17
18
version: "3.5"
services:
minio:
image: minio/minio
ports:
- "14033:9000"
volumes:
- /home/dockerdata/v-minio:/data
environment:
MINIO_ACCESS_KEY: "username"
MINIO_SECRET_KEY: "password"
command: server /data
deploy:
replicas: 1
restart_policy:
condition: on-failure
placement:
constraints: [node.hostname == me]

minio设置永久分享

1
2
3
4
docker exec -it <容器id> bash
curl https://dl.minio.io/client/mc/release/linux-amd64/mc --output mc
./mc config host add minio http://ip:14033 username password
./mc policy set public minio/<桶的名字>

设置成功后该桶就可以通过url了进行拼接访问了

图床客户端工具

方案一:typora+python+minio(采用)

安装
1
2
3
4
git clone https://github.com/minio/minio-py
cd minio-py
#需要代理下载
sudo python setup.py install
脚本
1
2
3
4
5
6
7
8
9
10
11
12
13
14
15
16
17
18
19
20
21
22
23
24
25
26
27
28
29
30
31
32
import os
import time
import uuid
import sys
import requests
from minio import Minio
from minio.error import ResponseError
import warnings

warnings.filterwarnings('ignore')
images = sys.argv[1:]
minioClient = Minio("ip:port",
access_key='用户名', secret_key='密码', secure=False)
result = "Upload Success:\n"
date = time.strftime("%Y%m%d%H%M%S", time.localtime())

for image in images:
file_type = os.path.splitext(image)[-1]
new_file_name = date + file_type
if image.endswith(".png") or image.endswith(".jpg") or image.endswith(".gif"):
content_type ="image/"+file_type.replace(".", "");
else:
content_type ="image/jpg"
continue
try:
minioClient.fput_object(bucket_name='blog', object_name= new_file_name, file_path=image,content_type=content_type)
if image.endswith("temp"):
os.remove(image)
result = result +"http://ip:port" + "/blog/" + new_file_name + "\n"
except ResponseError as err:
result = result + "error:" + err.message + "\n"
print(result)

参考

Minio+Nginx搭建私有图床,写博客从未这么爽

python-client-quickstart-guide

方案二:upic+typora+minio

参考:Typora搭配uPic使用minIO自建图床

注意事项

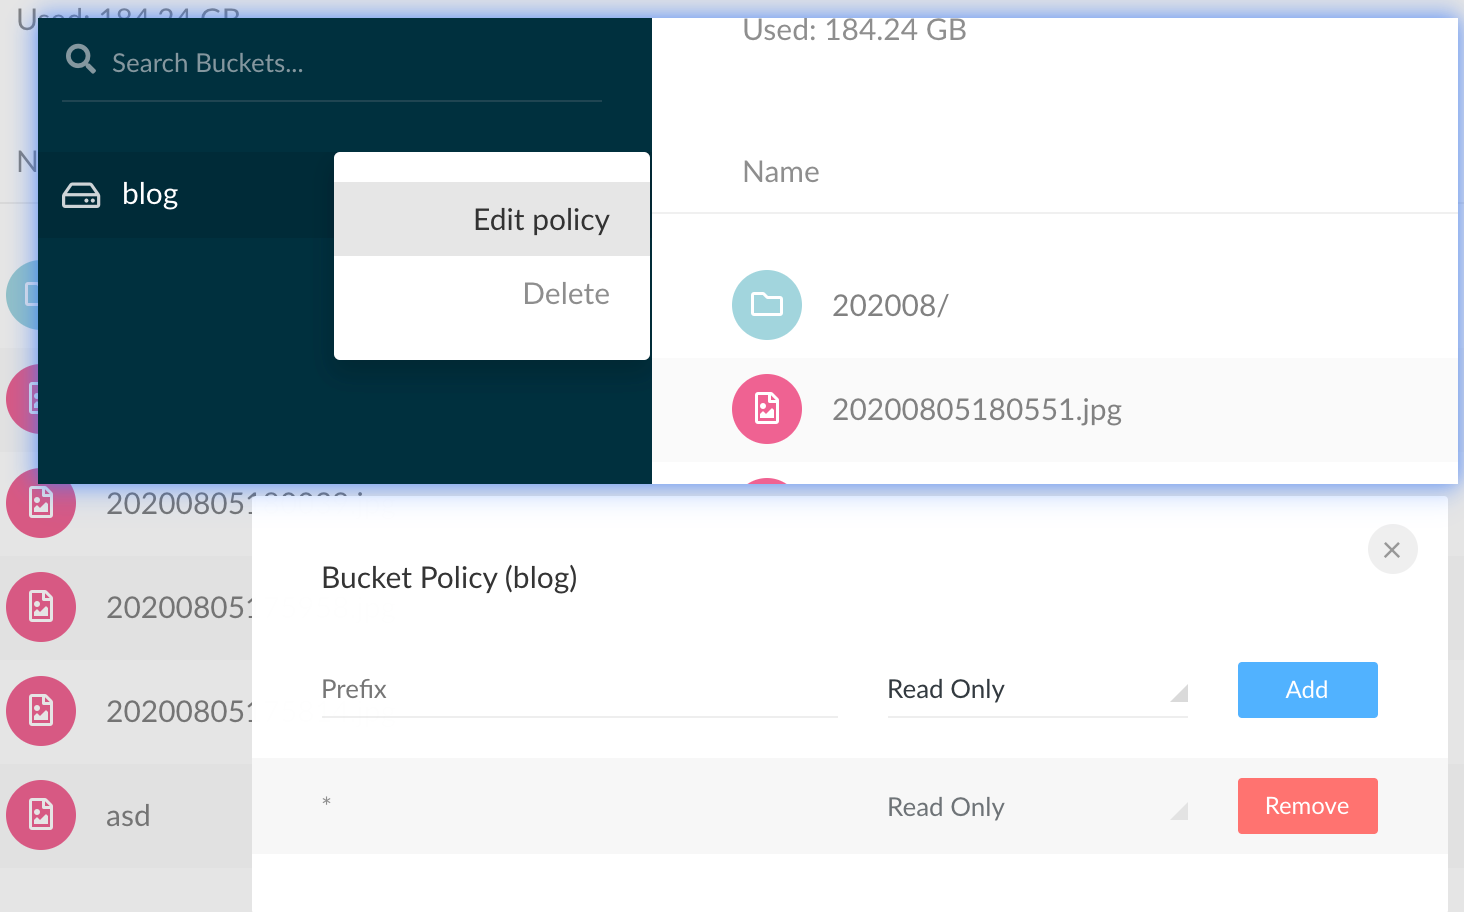
minio图片不能预览

  1. 需要设置

image-20200805182053298

  1. 以及上传图片需要设置content_type为image/jpg

minio k8s helm chart 部署

部署

1
2
helm repo add minio https://charts.min.io/
helm install --set rootUser=rootuser,rootPassword=rootpass123 --generate-name minio/minio

minio k8s 部署

1
2
3
4
5
6
7
8
9
10
11
12
13
14
15
16
17
18
19
20
21
22
23
24
25
26
27
28
29
30
31
32
33
34
35
36
37
38
39
40
41
42
43
44
45
46
47
48
49
50
51
52
53
54
55
56
57
58
59
60
61
62
63
64
65
66
67
68
69
70
71
72
73
74
75
76
77
78
79
80
81
82
83
84
85
86
87
88
89
90
91
92
93
94
95
96
97
---
apiVersion: apps/v1
kind: Deployment
metadata:
annotations: {}
labels:
k8s.kuboard.cn/name: minio
name: minio
namespace: exxk
resourceVersion: '26439668'
spec:
progressDeadlineSeconds: 600
replicas: 1
revisionHistoryLimit: 10
selector:
matchLabels:
k8s.kuboard.cn/name: minio
strategy:
rollingUpdate:
maxSurge: 25%
maxUnavailable: 25%
type: RollingUpdate
template:
metadata:
creationTimestamp: null
labels:
k8s.kuboard.cn/name: minio
spec:
containers:
- args:
- server
- /data
- '--console-address'
- ':30697'
env:
- name: MINIO_ACCESS_KEY
value: root
- name: MINIO_SECRET_KEY
value: miniominio
image: minio/minio
imagePullPolicy: Always
name: minio
ports:
- containerPort: 9000
protocol: TCP
- containerPort: 30697
protocol: TCP
resources: {}
terminationMessagePath: /dev/termination-log
terminationMessagePolicy: File
volumeMounts:
- mountPath: /data
name: volume-ckiim
dnsPolicy: ClusterFirst
restartPolicy: Always
schedulerName: default-scheduler
securityContext: {}
terminationGracePeriodSeconds: 30
volumes:
- name: volume-ckiim
persistentVolumeClaim:
claimName: minio

---
apiVersion: v1
kind: Service
metadata:
annotations: {}
labels:
k8s.kuboard.cn/name: minio
name: minio
namespace: exxk
resourceVersion: '6221073'
spec:
clusterIP: 10.233.53.94
clusterIPs:
- 10.233.53.94
externalTrafficPolicy: Cluster
internalTrafficPolicy: Cluster
ipFamilies:
- IPv4
ipFamilyPolicy: SingleStack
ports:
- name: j7ffb8
nodePort: 31175
port: 9000
protocol: TCP
targetPort: 9000
- name: wgtsfa
nodePort: 30697
port: 30697
protocol: TCP
targetPort: 30697
selector:
k8s.kuboard.cn/name: minio
sessionAffinity: None
type: NodePort

mc客户端使用

1
2
3
4
5
6
7
8
9
10
11
12
13
14
15
16
17
18
19
20
21
22
23
bash-5.1# mc alias set myminio http://localhost:9000 myaccesskey mysecretkey
Added `myminio` successfully.
bash-5.1#
bash-5.1# mc ls myminio
[2023-10-11 10:02:09 UTC] 0B test/
bash-5.1# echo '{
"Rules": [
{
"ID": "ExpirePrefixDir",
"Status": "Enabled",
"Filter": {
"Prefix": "recognitionLog/"
},
"Expiration": {
"Days": 1
}
}
]
}' > lifecycle.json
bash-5.1# mc ilm import myminio/test < lifecycle.json
Lifecycle configuration imported successfully to `myminio/test`.
#上述设置过期时间,和界面设置的似乎是一致的,现在需要确定删除的时间,设置为1天,但是实际删除时间应该大于1天,取决于minio定时任务执行的时间
#经验证,设置的时间会在过期时间上门加1天,才会删除

动态监听队列

需求

这里需要监听多个队列,而且运行途中可能会增加监听,或减少监听,因此实现需要采用SimpleMessageListenerContainer

步骤

  1. 添加gradle依赖

    1
    2
    implementation 'org.springframework.boot:spring-boot-starter-amqp'
    compile 'cn.hutool:hutool-all:5.3.8'
  2. 添加application.properties

    1
    2
    3
    4
    5
    6
    7
    8
    9
    spring.rabbitmq.host=10.10.10.11
    spring.rabbitmq.port=14012
    spring.rabbitmq.username=test
    spring.rabbitmq.password=test
    spring.rabbitmq.virtual-host=/
    spring.rabbitmq.connection-timeout=5000
    spring.rabbitmq.countDownLatch=5
    spring.rabbitmq.webport=14013
    spring.rabbitmq.websocket-port=14014
  3. 创建一个监听类RbMQReceiverHandler.java

    1
    2
    3
    4
    5
    6
    7
    8
    9
    10
    11
    12
    13
    14
    /**
    * 监听接收消息
    */
    @Component
    public class RbMQReceiverHandler implements MessageListener {
    private final Logger log = LoggerFactory.getLogger(getClass());

    @Override
    public void onMessage(Message message) {
    log.info("====接收到" + message.getMessageProperties().getConsumerQueue() + "队列的消息=====");
    log.info(message.getMessageProperties().toString());
    log.info(new String(message.getBody()));
    }
    }
  4. 创建一个RabbitMQConfig.java配置文件

    1
    2
    3
    4
    5
    6
    7
    8
    9
    10
    11
    12
    13
    14
    15
    16
    @Configuration
    @Import(cn.hutool.extra.spring.SpringUtil.class) //huTool添加,才能用getBean
    public class RabbitMQConfig {

    @Autowired
    RbMQReceiverHandler rbMQReceiverHandler;

    @Bean
    public SimpleMessageListenerContainer messageListenerContainer(ConnectionFactory connectionFactory) {
    SimpleMessageListenerContainer container = new SimpleMessageListenerContainer();
    container.setConnectionFactory(connectionFactory);
    container.setQueueNames("test1_staff");
    container.setMessageListener(rbMQReceiverHandler);
    return container;
    }
    }
  5. 添加一个动态添加队列的接口

    1
    2
    3
    4
    5
    6
    7
    8
    9
    10
    11
    12
    13
    14
    15
    16
    17
    18
    @RestController
    @RequestMapping("/queue")
    public class RbController {

    @PostMapping
    public String addQueue(@RequestParam String queueNmae) {
    SimpleMessageListenerContainer container = SpringUtil.getBean(SimpleMessageListenerContainer.class);//获取实例
    container.addQueueNames(queueNmae);
    return "add " + queueNmae + " ok";
    }

    @DeleteMapping
    public String delQueue(@RequestParam String queueNmae) {
    SimpleMessageListenerContainer container = SpringUtil.getBean(SimpleMessageListenerContainer.class);
    container.removeQueueNames(queueNmae);
    return "delete " + queueNmae + " ok";
    }
    }
  6. 测试调用post 127.0.0.1:8080/queue 接口就能添加队列了,发送mq的消息没写测试方法,但是可以直接到mq的管理页面push一条消息进行测试

多线程监听队列

监听队列时,单线程

参考

工作随笔——rabbitmq的多线程监听(Springboot)

springboot 配置jconsole

  1. 设置远程连接访问密码
1
2
3
4
5
6
7
8
9
10
11
12
# 查看java安装目录
echo $PATH
# 切换到java安装目录
cd /usr/local/jvm/jdk1.8.0_77/jre/lib/management
# 创建一个密码文件
cp jmxremote.password.template jmxremote.password
# 添加文件可写权限
chmod +x jmxremote.password
# 取消最后两行注释 monitorRole QED 和controlRole R&D
vim jmxremote.password
# 修改文件权限为400或600解决启动`错误: 必须限制口令文件读取访问`
chmod 400 jmxremote.password
  1. 修改启动命令,启动springboot
1
2
3
4
5
6
7
8
9
10
11
12
13
14
15
16
#方式一
##环境变量
JAVA_OPTS='-Djava.rmi.server.hostname=当前服务器公网ip
-Dcom.sun.management.jmxremote -Dcom.sun.management.jmxremote.port=8888
-Dcom.sun.management.jmxremote.rmi.port=8888
-Dcom.sun.management.jmxremote.authenticate=true
-Dcom.sun.management.jmxremote.ssl=false'
##启动命令
java $JAVA_OPTS -jar springboot.jar
#方式二 直接在启动命令里面加,不通过环境变量
java Djava.rmi.server.hostname=当前服务器公网ip
-Dcom.sun.management.jmxremote -Dcom.sun.management.jmxremote.port=8888
-Dcom.sun.management.jmxremote.rmi.port=8888
-Dcom.sun.management.jmxremote.authenticate=true
-Dcom.sun.management.jmxremote.ssl=false
-jar springboot.jar
  1. 在本地启动jconsole

    终端里面执行jconsole就会打开jconsole

    然后选择远程连接,输入ip:端口 eg:10.10.10.11:8888然后输入用户名(monitorRole)和密码(QED)或者用户名:controlRole密码:R&D

参考

基于Springboot项目使用jconsole远程监控JVM

Linux 错误: 必须限制口令文件读取访问: /sy/java/jdk1.6.0_26/jre/lib/management/jmxremote.password

配置修改脚本

测试文件a.conf

1
2
3
4
sex=boy
age=8
url=http://www.baidu.com
"systemUrl": "http://10.254.197.9:9304",

常用脚本命令

1
2
3
4
5
6
7
8
9
10
11
12
13
14
15
16
17
18
19
20
21
22
#查看包含sex的行
cat a.conf | grep sex
#替换sex=boy为sex=girl,-i为写入文件
sed -i "s/sex=boy/sex=girl/" a.conf
# 替换sex的值,\S用于匹配除单个空格符之外的所有字符,输出age=8
sed -i "s/age=\S*/age=9/" a.conf
# 注释sex开头的配置,&代表任意字符
sed -i 's/^sex/;&/' a.conf
# 取消注释
sed -i 's/^;\(sex\)/\1/' a.conf
# 在age配置后加一行;this is age
sed -i '/age/a\;this is age' a.conf
# 在age配置前加一行;this is age
sed -i '/age/i\;this is age' a.conf
# 删除所有匹配;this is age的行
sed -i '/;this is age/d' a.conf
# 修改url,如果url里面有空格会失败,因为S匹配非空格
sed -i "s/url=\S*/url=http:\/\/www.baidu.com/" a.conf
# 替换ip
sed -i "s/10.254.197.9/127.0.0.1/" a.conf
# 匹配行头,然后替换整行,适用于包含空格的格式 '/^行头/c\整行替换的值' 加反斜杠\是为了区分内容可省略
sed -i '/^url/c\url = 2' a.conf

SpringBoot 遇到问题总结

request.getInputStream() 为null问题解决

知识总结

request.getInputStream(); request.getReader(); 和request.getParameter(“key”);

这三个函数中任何一个方法执行一次后(可正常读取body数据),之后再执行就无效了。读取之后游标就向后面移动了

问题描述

  1. 使用postman请求没有任何问题,都能读取到
  2. 升级springboot 2.2.0以上版本,也不会有任何问题,能读取到

问题分析

  1. 在control使用request.getInputStream()时获取不到数据流,标记数据被读,断点看req->request->inputStream->ib->state 如果state=2代表该输入流已读,再次读取就会为null,state=0代码未读
  2. postman能读取,是因为设置了请求头Content-Type所以不存在读取不了,因此也和后面那个过滤器进入的条件有关,所以带请求头的并不会进入过滤器
  3. springboot 2.2.0以上可以读取,估计是修复该问题
  4. springboot 2.2.0以下版本到底是哪里读取了InputStream,最后找到了一个过滤器HiddenHttpMethodFilter,里面断点,的确进去了,并用了request.getParameter方法

问题解决

升级,或者添加配置禁用HiddenHttpMethodFilter过滤器,代码如下

1
2
3
4
5
6
7
8
9
10
11
12
13
14
15
16
17
18
19
20
21
22
23
24
25
@Configuration
public class ConfigurationData {
@Bean
public HttpPutFormContentFilter httpPutFormContentFilter() {
return new HttpPutFormContentFilter();
}
@Bean
public FilterRegistrationBean disableSpringBootHttpPutFormContentFilter(HttpPutFormContentFilter filter) {
FilterRegistrationBean filterRegistrationBean = new FilterRegistrationBean();
filterRegistrationBean.setFilter(filter);
filterRegistrationBean.setEnabled(false);
return filterRegistrationBean;
}
@Bean
public HiddenHttpMethodFilter hiddenHttpMethodFilter() {
return new HiddenHttpMethodFilter();
}
@Bean
public FilterRegistrationBean disableSpringBootHiddenHttpMethodFilter(HiddenHttpMethodFilter filter) {
FilterRegistrationBean filterRegistrationBean = new FilterRegistrationBean();
filterRegistrationBean.setFilter(filter);
filterRegistrationBean.setEnabled(false);
return filterRegistrationBean;
}
}

测试源码

  1. 测试接口接收类

    1
    2
    3
    4
    5
    6
    7
    8
    9
    10
    11
    12
    13
    14
    15
    16
    17
    18
    19
    20
    21
    22
    23
    24
    25
    26
    27
    28
    29
    30
    31
    32
    33
    34
    35
    36
    37
    38
    39
    40
    41
    @RestController
    @RequestMapping(value = "/xmbankaccess")
    public class XmBankAccessControl {
    private final Logger logger = LoggerFactory.getLogger(getClass());

    @RequestMapping(value = "/facecompare")
    public void facecompare(HttpServletRequest req, HttpServletResponse rsp) throws IOException {
    logger.info("begin");
    byte[] reqByte = readReqData(req);
    String str = new String(reqByte);
    logger.info(str);
    }

    private byte[] readReqData(HttpServletRequest request) throws IOException {
    BufferedInputStream bis = null;
    byte[] reqBuff = null;
    try {
    bis = new BufferedInputStream(request.getInputStream());
    byte[] buff = new byte[1024];
    int len = 0;
    int count = 0;
    ByteArrayOutputStream baos = new ByteArrayOutputStream();
    while ((len = bis.read(buff, 0, buff.length)) != -1) {
    baos.write(buff, 0, len);
    count += len;
    }
    baos.close();
    reqBuff = new byte[count];
    System.arraycopy(baos.toByteArray(), 0, reqBuff, 0, count);

    } catch (IOException e) {
    logger.error("读请求信息异常:", e);
    } finally {
    if (bis != null) {
    bis.close();
    bis = null;
    }
    }
    return reqBuff;
    }
    }
  2. 测试请求类

    1
    2
    3
    4
    5
    6
    7
    8
    9
    10
    11
    12
    13
    14
    15
    16
    17
    18
    19
    20
    21
    22
    23
    24
    25
    26
    27
    28
    29
    30
    31
    32
    33
    34
    35
    36
    37
    38
    39
    40
    41
    42
    43
    44
    45
    46
    47
    48
    49
    50
    51
    52
    53
    54
    55
    56
    57
    58
    59
    60
    61
    62
    63
    64
    65
    66
    67
    68
    69
    70
    71
    72
    73
    74
    75
    76
    public class AddFaceTest {

    private static final Logger log = LoggerFactory.getLogger("aaa");

    public static void main(String[] args) throws IOException, InterruptedException {
    sendMsgHttp("aaaa".getBytes());
    }

    public static byte[] sendMsgHttp(Object paramObj) {
    // 日志-开始处理
    if (log.isInfoEnabled()) {
    log.info("HTTP通讯处理开始。。。");
    }
    // 参数初始化
    byte[] inData = null;
    byte[] outData = null;
    URL url = null;
    URLConnection conn = null;
    // 读取输入的数据
    if ((paramObj instanceof byte[])) {
    inData = (byte[]) paramObj;
    } else {
    log.error("数据错误:输入的参数必须是byte[]或CompositeData类型的数据");
    return null;
    }
    OutputStream os = null;
    BufferedInputStream is = null;
    try {
    // 建立连接
    // url = new URL("http://127.0.0.1:8080/xmbankaccess/facecompare");
    url = new URL("http://127.0.0.1:9980/xmbankaccess/facecompare");
    conn = url.openConnection();
    conn.setConnectTimeout(6000);
    conn.setReadTimeout(6000);
    conn.setDoOutput(true);
    if (log.isInfoEnabled()) {
    log.info("URL连接已打开。。。");
    }
    // 发送请求数据
    os = conn.getOutputStream();
    if (log.isDebugEnabled()) {
    log.debug("向Servlet发送的请求数据为:" + new String(inData, "UTF-8"));
    }
    os.write(inData);
    os.flush();
    // 读取响应数据
    is = new BufferedInputStream(conn.getInputStream());
    int availableSize = 0;
    byte[] buffer = new byte[8192];
    ByteArrayOutputStream baos = new ByteArrayOutputStream();
    while ((availableSize = is.read(buffer)) != -1) {
    baos.write(buffer, 0, availableSize);
    }
    outData = baos.toByteArray();
    baos.close();
    } catch (Exception e) {
    log.error("通讯发生异常:", e);
    } finally {
    try {
    if (null != os) {
    os.close();
    }
    if (null != is) {
    is.close();
    }
    } catch (IOException e) {
    log.error(e.getMessage());
    }
    }
    // 判断响应的内容是否为空,空则直接返回
    if (outData == null) {
    outData = "aa".getBytes();
    }
    return outData;
    }
    }

    参考

    SpringMVC 中 request.getInputStream() 为空解惑

git多项目管理方案

git-repo 多项目管理

安装

1
2
3
4
5
6
7
8
9
10
11
# Debian/Ubuntu. 系统
$ sudo apt-get install repo
# Gentoo. 系统
$ sudo emerge dev-vcs/repo
# 其他系统下载脚本
curl https://storage.googleapis.com/git-repo-downloads/repo
# 添加执行权限
chmod a+rx repo
# 需要全局执行命令根据自己的系统进行配置环境变量,也可以放进项目里面,再项目里面运行
# mac 安装
mv repo /usr/local/bin

使用

1
2
3
4
5
# 修改repo文件里面的地址,不然需要外网
# REPO_URL = 'https://gerrit.googlesource.com/git-repo'
REPO_URL = 'https://mirrors.ustc.edu.cn/aosp/git-repo'
# 也可以使用环境变量,或者使用命令时代参数
repo init --repo-url=https://gerrit-google.tuna.tsinghua.edu.cn/git-repo
repo init
1
2
3
4
5
6
7
8
9
./repo init -u your_project_git_url
./repo init -u git@github.com:xuanfong1/springLeaning.git
#----------------------可选参数-----------------------------------------
#-b 选取的 manifest 仓库分支,默认 master
#-m 选取的默认配置文件,默认 default.xml
#--depth=1 git clone 的深度,一般如在 Jenkins 上打包时可用,加快代码 clone 速度
#--repo-url=URL 使用自定义的 git-repo 代码,如前面说到的 fix 了 bug 的 git-repo
#--no-repo-verify 不验证 repo 的源码,如果自定义了 repo url 那么这个一般也加上
#----------------------------------------------------------------------

springboot 添加xml报文接口

一般的接口都是用json,这篇介绍如何用jackson写xml报文接口

1. 给springboot添加依赖

1
2
compile group: 'com.fasterxml.jackson.dataformat', name: 'jackson-dataformat-xml', version: '2.10.1'
compile group: 'com.fasterxml.jackson.module', name: 'jackson-module-jaxb-annotations', version: '2.10.1'

2. 创建实体类类

封装属性类

<Element attr="s,103">value</Element>如果不封装,就没有attr这个属性

1
2
3
4
5
6
7
8
9
10
11
12
13
14
15
16
17
18
19
20
@Data
public class Element {
@JacksonXmlProperty(isAttribute = true)
private String attr="q";

@JacksonXmlText
private String value;

public Element() {
}

public Element(String attr) {
this.attr = attr;
}

public Element(String attr, String value) {
this.attr = attr;
this.value = value;
}
}

用户测试类

1
2
3
4
5
6
7
8
9
10
11
12
13
14
15
16
17
18
19
20
21
22
23
24
25
26
import com.fasterxml.jackson.dataformat.xml.annotation.JacksonXmlProperty;
import com.fasterxml.jackson.dataformat.xml.annotation.JacksonXmlRootElement;
import lombok.Data;

@JacksonXmlRootElement(localName = "service")
@Data
public class XmlTestBean {
@JacksonXmlProperty(isAttribute = true)
private String version = "2.0";
@JacksonXmlProperty(localName = "BODY")
private Body body;
@Data
public class Body {
@JacksonXmlProperty(localName = "TX_CODE")
private Element txCode;
@JacksonXmlProperty(localName = "Name")
private Element name;
}
@JacksonXmlProperty(localName = "SYS_HEAD")
private SysHead sysHead;
@Data
public class SysHead {
@JacksonXmlProperty(localName = "TRAN_TIMESTAMP")
private Element tranTimestamp;
}
}

3. 写测试接口

1
2
3
4
5
6
7
8
9
10
11
12
13
14
15
16
17
18
19
20
21
22
23
24
25
26
@RestController
@RequestMapping("/xml")
public class XmlController {
private Logger logger=Logger.getLogger(String.valueOf(getClass()));

/***
* consumes为请求参数的格式 Content-Type设置为application/xml
* produces为返回内容的格式 Content-Type设置为application/xml
* @param xmlTestBean
* @return
*/
@RequestMapping(value = "/test",consumes = MediaType.APPLICATION_XML_VALUE,produces = MediaType.TEXT_XML_VALUE)
@ResponseBody
public XmlTestBean test(@RequestBody XmlTestBean xmlTestBean){
logger.info("receive data: "+xmlTestBean.toString());
xmlTestBean.setVersion(xmlTestBean.getVersion()+"0");
XmlTestBean.Body body= xmlTestBean.getBody();
Element name =body.getName();
name.setAttr(name.getAttr()+"1");
name.setValue(name.getValue()+"2");
body.setName(name);
body.setTxCode(new Element(body.getTxCode().getAttr()+"3",body.getTxCode().getValue()+"4"));
xmlTestBean.setBody(body);
return xmlTestBean;
}
}

4. 优化返回

返回添加

1
2
3
4
5
6
7
8
9
10
11
12
13
14
15
16
17
18
19
20
21
22
@Configuration
public class Config {
/**
* jackson 转xml 全局配置
*
* @param builder
* @return
*/
@Bean
public MappingJackson2XmlHttpMessageConverter mappingJackson2XmlHttpMessageConverter(
Jackson2ObjectMapperBuilder builder) {
ObjectMapper mapper = builder.createXmlMapper(true).build();
// 设置全局返回显示 <?xml version='1.0' encoding='UTF-8'?>
((XmlMapper) mapper).enable(ToXmlGenerator.Feature.WRITE_XML_DECLARATION);
//<?xml version='1.0' encoding='UTF-8'?> 改为双引号 <?xml version="1.0" encoding="UTF-8"?>
String propName = com.ctc.wstx.api.WstxOutputProperties.P_USE_DOUBLE_QUOTES_IN_XML_DECL;
((XmlMapper) mapper).getFactory()
.getXMLOutputFactory()
.setProperty(propName, true);
return new MappingJackson2XmlHttpMessageConverter(mapper);
}
}

5. 测试数据

请求数据
1
2
3
4
5
6
7
8
9
10
11
12
13
14
15
16
17
18
19
20
21
22
23
24
25
26
27
<?xml version="1.0" encoding="UTF-8"?>
<service version="2.0">
<BODY>
<TX_CODE attr="s,10">facecompare</TX_CODE>
<Name attr="s,10">facecompare</Name>
<IdentNo attr="s,10">99999</IdentNo>
<IdentPhtFilePath attr="s,255">1.jpg</IdentPhtFilePath>
<SpotPhtFilePath attr="s,255">1.jpg</SpotPhtFilePath>
<OvlapPhtFlg attr="s,255">1</OvlapPhtFlg>
<CnlNo attr="s,255">12</CnlNo>
</BODY>
<SYS_HEAD>
<TRAN_TIMESTAMP attr="s,6">153907</TRAN_TIMESTAMP>
<CONSUMER_SEQ_NO attr="s,42">137000140118100000042563</CONSUMER_SEQ_NO>
<WS_ID attr="s,30">p5</WS_ID>
<SERVICE_SCENE attr="s,2">01</SERVICE_SCENE>
<CONSUMER_ID attr="s,6">137000</CONSUMER_ID>
<SERVICE_CODE attr="s,11">11002000018</SERVICE_CODE>
<TRAN_DATE attr="s,8">20140118</TRAN_DATE>
</SYS_HEAD>
<APP_HEAD>
<USER_ID attr="s,30">00120242</USER_ID>
<PER_PAGE_NUM attr="s,3"></PER_PAGE_NUM>
<QUERY_KEY attr="s,256"></QUERY_KEY>
<BRANCH_ID attr="s,9">0135</BRANCH_ID>
</APP_HEAD>
</service>
返回数据
1
2
3
4
5
6
7
8
9
10
<?xml version="1.0" encoding="UTF-8"?>
<service version="2.00">
<BODY>
<TX_CODE attr="s,103">facecompare4</TX_CODE>
<Name attr="s,101">facecompare2</Name>
</BODY>
<SYS_HEAD>
<TRAN_TIMESTAMP attr="s,6">153907</TRAN_TIMESTAMP>
</SYS_HEAD>
</service>

源码

xuanfong1/springLeaning

Mac 安装tomcat

  1. 下载tomcat8,选择zip,双击解压
  2. 执行sudo mv ~/Downloads/apache-tomcat-8.5.49 /Library
  3. idea配置tomact
  4. Idea添加web