0%

项目配置

build.gradle

1
2
3
4
5
6
7
8
9
10
11
12
13
14
15
16
17
18
19
20
21
22
23
24
25
26
27
28
29
30
31
32
33
34
35
36
group 'com.xuan'
version '1.0-SNAPSHOT'

apply plugin: 'groovy'
apply plugin: 'java'
apply plugin: 'war'
apply plugin: 'idea'

sourceCompatibility = 1.8

repositories {
mavenCentral()
}

dependencies {
compile group: 'org.codehaus.groovy', name: 'groovy-all', version: '2.4.7'
compile group: 'javax.servlet', name: 'jstl', version: '1.2'
// Spring
compile group: 'org.springframework', name: 'spring-core', version: '4.3.4.RELEASE'
compile group: 'org.springframework', name: 'spring-web', version: '4.3.4.RELEASE'
compile group: 'org.springframework', name: 'spring-webmvc', version: '4.3.4.RELEASE'
compile group: 'org.springframework', name: 'spring-jdbc', version: '4.3.4.RELEASE'
compile group: 'org.springframework', name: 'spring-aop', version: '4.3.4.RELEASE'
compile group: 'org.springframework', name: 'spring-context', version: '4.3.4.RELEASE'
compile group: 'org.springframework', name: 'spring-beans', version: '4.3.4.RELEASE'
compile group: 'org.springframework', name: 'spring-test', version: '4.3.4.RELEASE'
// MyBatis
compile group: 'org.mybatis', name: 'mybatis', version: '3.4.1'
compile group: 'org.mybatis', name: 'mybatis-spring', version: '1.3.0'
compile group: 'mysql', name: 'mysql-connector-java', version: '5.1.40'
// junit
compile group: 'junit', name: 'junit', version: '4.12'

testCompile group: 'junit', name: 'junit', version: '4.12'

}

web.xml

1
2
3
4
5
6
7
8
9
10
11
12
13
14
15
16
17
18
19
20
21
22
23
<?xml version="1.0" encoding="UTF-8"?>
<web-app xmlns="http://xmlns.jcp.org/xml/ns/javaee"
xmlns:xsi="http://www.w3.org/2001/XMLSchema-instance"
xsi:schemaLocation="http://xmlns.jcp.org/xml/ns/javaee http://xmlns.jcp.org/xml/ns/javaee/web-app_3_1.xsd"
version="3.1">
<servlet>
<!--名称 -->
<servlet-name>dispatcher</servlet-name>
<!-- Servlet类 -->
<servlet-class>org.springframework.web.servlet.DispatcherServlet</servlet-class>
<init-param>
<param-name>contextConfigLocation</param-name>
<param-value>classpath:config/spring/spring-mvc.xml</param-value>
</init-param>
<!-- 启动顺序,数字越小,启动越早 -->
<load-on-startup>1</load-on-startup>
</servlet>
<!--所有请求都会被dispatcher拦截 -->
<servlet-mapping>
<servlet-name>dispatcher</servlet-name>
<url-pattern>/</url-pattern>
</servlet-mapping>
</web-app>

spring-mvc.xml

1
2
3
4
5
6
7
8
9
10
11
12
13
14
15
16
17
18
19
20
21
22
23
24
25
26
27
28
<?xml version="1.0" encoding="UTF-8"?>
<beans xmlns="http://www.springframework.org/schema/beans"
xmlns:xsi="http://www.w3.org/2001/XMLSchema-instance"
xmlns:context="http://www.springframework.org/schema/context"
xmlns:mvc="http://www.springframework.org/schema/mvc"
xsi:schemaLocation="http://www.springframework.org/schema/beans http://www.springframework.org/schema/beans/spring-beans.xsd http://www.springframework.org/schema/context http://www.springframework.org/schema/context/spring-context.xsd http://www.springframework.org/schema/mvc http://www.springframework.org/schema/mvc/spring-mvc.xsd">
<!-- 自动扫描控制器,实现支持注解的IOC ,设置要扫描的包,一般含controller类的包-->
<context:component-scan base-package="com.xuan"/>

<!-- Spring MVC不处理静态资源 -->
<mvc:default-servlet-handler/>

<!-- 支持mvc注解驱动,控制器映射器和控制器适配器 -->
<mvc:annotation-driven/>

<!--静态文件访问权限配置(静态资源映射器)-->
<mvc:resources mapping="statics/**" location="/WEB-INF/"/>

<!-- 视图解析器 -->
<bean id="internalResourceViewResolver"
class="org.springframework.web.servlet.view.InternalResourceViewResolver">
<!-- 前缀,设置页面的目录 -->
<property name="prefix" value="/"/>
<!-- 后缀,页面的后缀 -->
<property name="suffix" value=".jsp"/>
</bean>
<import resource="spring-mybatis.xml"/>
</beans>

spring-mybatis.xml

1
2
3
4
5
6
7
8
9
10
11
12
13
14
15
16
17
18
19
20
21
22
23
24
25
26
27
28
29
30
31
32
33
34
35
36
37
38
39
40
41
42
43
44
45
<?xml version="1.0" encoding="UTF-8"?>
<beans xmlns="http://www.springframework.org/schema/beans"
xmlns:xsi="http://www.w3.org/2001/XMLSchema-instance"
xmlns:context="http://www.springframework.org/schema/context" xmlns:tx="http://www.springframework.org/schema/tx"
xsi:schemaLocation="http://www.springframework.org/schema/beans http://www.springframework.org/schema/beans/spring-beans.xsd http://www.springframework.org/schema/context http://www.springframework.org/schema/context/spring-context.xsd http://www.springframework.org/schema/tx http://www.springframework.org/schema/tx/spring-tx.xsd">
<!--加载jdbc文件-->
<context:property-placeholder location="classpath:config/mybatis/jdbc-mysql.properties"/>
<!-- 配置数据源 -->
<bean id="dataSource" class="org.springframework.jdbc.datasource.DriverManagerDataSource">
<property name="driverClassName" value="${jdbc.driverClassName}"/>
<property name="url" value="${jdbc.url}"/>
<property name="username" value="${jdbc.username}"/>
<property name="password" value="${jdbc.password}"/>
</bean>

<!-- 配置Session工厂 -->
<bean id="sqlSessionFactory" class="org.mybatis.spring.SqlSessionFactoryBean">
<property name="dataSource" ref="dataSource"/>
<!-- 加载mybatis-config.xml文件,mybatis配置文件路径 -->
<property name="configLocation" value=""/>
<!--自动扫描需要定义类别名的包,将包内的JAVA类的类名作为类别名-->
<property name="typeAliasesPackage" value="com.xuan.model"/>

<!-- 指定实体类映射文件,可以指定同时指定某一包以及子包下面的所有配置文件,可以直接指定文件 -->
<property name="mapperLocations" value="classpath:sqlMapper/*.xml"/>
</bean>

<!--动态代理实现 不用写dao的实现 -->
<bean id="mapperScannerConfigurer" class="org.mybatis.spring.mapper.MapperScannerConfigurer">
<!-- 这里的basePackage 指定了dao层接口路劲,这里的dao接口不用自己实现 -->
<property name="basePackage" value="com.xuan.dao"/>
<!-- 如果只有一个数据源的话可以不用指定,但是如果有多个数据源的话必须要指定 -->
<!-- <property name="sqlSessionFactoryBeanName" value="sqlSessionFactory" /> -->
<!--直接指定了sqlsessionTemplate名称,这个和上面的其实是一样的 -->
<!-- <property name="sqlSessionTemplateBeanName" value="sqlSession" /> -->
</bean>

<!-- 配置事务管理器 -->
<bean id="transactionManager" class="org.springframework.jdbc.datasource.DataSourceTransactionManager">
<property name="dataSource" ref="dataSource"/>
</bean>

<!-- 使用全注释事务 -->
<tx:annotation-driven transaction-manager="transactionManager"/>
</beans>

jdbc-mysql.properties

1
2
3
4
5
6
7
8
9
10
# 将jdbc.jarDirection后的内容更改为gradle下载的
# mysql-connector-java-5.1.x.jar所在的路径,gradle自动下载的路径如下所示(未使用)
jdbc.jarDirection=/Users/xuan/.gradle/caches/modules-2/files-2.1/mysql\
/mysql-connector-java/5.1.40/ef2a2ceab1735eaaae0b5d1cccf574fb7c6e1c52/\
mysql-connector-java-5.1.40.jar
jdbc.driverClassName=com.mysql.jdbc.Driver
jdbc.url=jdbc:mysql://localhost:3306/goods?\
useUnicode=true&characterEncoding=UTF-8&useSSL=false
jdbc.username=root
jdbc.password=root

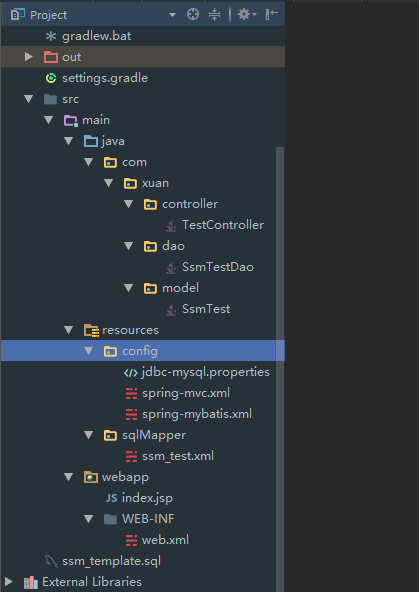
配置文件路径

路径(根目录/) 说明
src/main/webapp/WEB-INF/web.xml 基本配置文件(第一步,包含spring-mvc.xml)
src/main/resources/config/spring/spring-mvc.xml 配置spring(包含spring-mybatis.xml)
src/main/resources/config/spring/spring-mybatis.xml 配置mybatis(包含sqltest.xml和jdbc-mysql.properties)
src/main/resources/config/mybatis/jdbc-mysql.properties 数据库连接信息配置

项目示例:

测试文件路径

路径(根目录/) 说明
src/main/resources/sqlMapper/sqltest.xml 数据库语句
src/main/java/…/dao/TestDao.java 持久层,连接数据库(sqltest)
src/main/java/…/controller/xuantest.java

TestDao.java

1
2
3
4
5
6
7
8
package com.xuan.dao;

import org.springframework.stereotype.Repository;

@Repository //注册为持久层的bean
public interface TestDao {
String findname();
}

sqltest.xml

1
2
3
4
5
6
7
8
9
10
11
<?xml version="1.0" encoding="UTF-8" ?>
<!DOCTYPE mapper PUBLIC "-//mybatis.org//DTD Mapper 3.0//EN"
"http://mybatis.org/dtd/mybatis-3-mapper.dtd">

<!-- namespace的值就是dao接口的完整路劲,就这个demo而言namespace 就是TestDao.java的完整路劲 -->
<mapper namespace="com.xuan.dao.TestDao">
<!-- 这里的id就是接口中方法的名称,resulType,返回的bean,这里为String -->
<select id="findname" resultType="java.lang.String">
SELECT email FROM t_user WHERE loginname='123'
</select>
</mapper>

xuantest.java

1
2
3
4
5
6
7
8
9
10
11
12
13
14
15
16
17
18
19
package com.xuan.controller;

import com.xuan.dao.TestDao;
import org.springframework.stereotype.Controller;
import org.springframework.web.bind.annotation.RequestMapping;
import org.springframework.web.servlet.ModelAndView;
import javax.annotation.Resource;

@Controller
public class xuantest {
@Resource
private TestDao testDao;
@RequestMapping("test.html")
public ModelAndView totestPage(){
String a= testDao.findname();
System.out.printf(a);
return new ModelAndView("test");
}
}

index.jsp

1
2
3
4
5
6
7
8
9
<%@ page contentType="text/html;charset=UTF-8" language="java" %>
<html>
<head>
<title>$Title$</title>
</head>
<body>
<a href="test.html">进入web测试页面</a>
</body>
</html>

test.jsp

1
2
3
4
5
6
7
8
9
<%@ page contentType="text/html;charset=UTF-8" language="java" %>
<html>
<head>
<title>spring</title>
</head>
<body>
ssm配置成功
</body>
</html>
参考:

常用的两种spring、mybatis 配置方式

使用IDEA和gradle创建超市管理系统(一)

使用IDEA和gradle搭建Spring MVC和MyBatis开发环境

【ssm个人博客项目实战01】SSM环境搭建

项目基本目录结构

项目根/ 说明 Mark as
pom.iml 项目资源目录配置文件[^可视化配置界面] 自动生成
src/main/java 源代码目录,存放java代码 Sources
src/main/resources 配置(资源)文件存放目录 Resources
src/main/webapp 存放静态网页目录 web目录[^web目录设置]
src/test/java 测试代码目录 Tests
src/test/resources 测试配置(资源)文件目录 Tests Resources
target/ 输出根目录 Excluded

[^可视化配置界面]: 在Project Structure->Modules->Sources
[^web目录设置]: 在Project Structure->Modules->项目名->Web->配置xml的位置和web的目录和保护的资源目录

项目额外目录结构

项目根/ 说明 Mark as
src/site 与site相关资源目录
src/main/filters 资源过滤文件目录
src/main/assembly Assembly descriptors
src/mian/config 配置文件目录
src/main/scripts Application/Library scripts
src/test/filters 测试资源过滤文件目录
target/classes 项目主体输出目录
target/test-calsses 项目测试输出目录
target/site 项目site输出目录
LICENSE.md 项目license
NOTICE.md Notices and attributions required by libraries that the project depends on
README.md 项目readme
子项目打包

mvn clean package -pl module_name -am

mvn clean package -pl pf_model/bpf_pf_platform,pf_model/bpf_pf_process -am

-am –also-make 同时构建所列模块的依赖模块;

-amd -also-make-dependents 同时构建依赖于所列模块的模块;

-pl –projects 构建制定的模块,模块间用逗号分隔;

-rf -resume-from 从指定的模块恢复反应堆。

参考:

7天学会Maven(第二天——Maven 标准目录结构)

新建maven项目

new Project->Maven[^1]->...->finsh

[^1]: 如果加载不出来,修改内存Bulid->Build Tools->Maven->Importing->VM options for importer:{-Xmx2048m}

1. 新建grade项目步骤

相当于一个grade的工作空间

New Project -> Gradle -> [java] -> Next -> {Groupld:"com.xuan",Artifactld:"worksapcename"} -> Next -> Next -> Finish

2. 在grade项目新建model

新建一个springmvc项目(这里是一个model)

New Module->spring-[Spring MVC,Web Application,Application Server]->module name

3.运行程model

注意:

运行不起,请处理project structure配置里面的问题,具体操作参考上一篇eclipse项目导入idea

4.建立mvc目录结构

详见JavaEE之MVC目录结构idea之maven目录结构笔记

5.配置web.xml文件

1
2
3
4
5
6
7
8
9
10
11
12
13
14
15
16
17
18
19
20
21
22
23
24
25
26
27
28
29
30
31
32
33
<?xml version="1.0" encoding="UTF-8"?>
<web-app xmlns="http://xmlns.jcp.org/xml/ns/javaee"
xmlns:xsi="http://www.w3.org/2001/XMLSchema-instance"
xsi:schemaLocation="http://xmlns.jcp.org/xml/ns/javaee http://xmlns.jcp.org/xml/ns/javaee/web-app_3_1.xsd"
version="3.1">
<context-param>
<!--SpringMVC配置参数文件的位置 -->
<param-name>contextConfigLocation</param-name>
<param-value>classpath:spring-mvc.xml</param-value>
</context-param>

<listener>
<listener-class>org.springframework.web.context.ContextLoaderListener</listener-class>
</listener>

<servlet>
<!--名称 -->
<servlet-name>dispatcher</servlet-name>
<!-- Servlet类 -->
<servlet-class>org.springframework.web.servlet.DispatcherServlet</servlet-class>
<init-param>
<param-name>contextConfigLocation</param-name>
<param-value>classpath:dispatcher-servlet.xml</param-value>
</init-param>
<!-- 启动顺序,数字越小,启动越早 -->
<load-on-startup>1</load-on-startup>
</servlet>
<!--所有请求都会被dispatcher拦截 -->
<servlet-mapping>
<servlet-name>dispatcher</servlet-name>
<url-pattern>/</url-pattern>
</servlet-mapping>
</web-app>

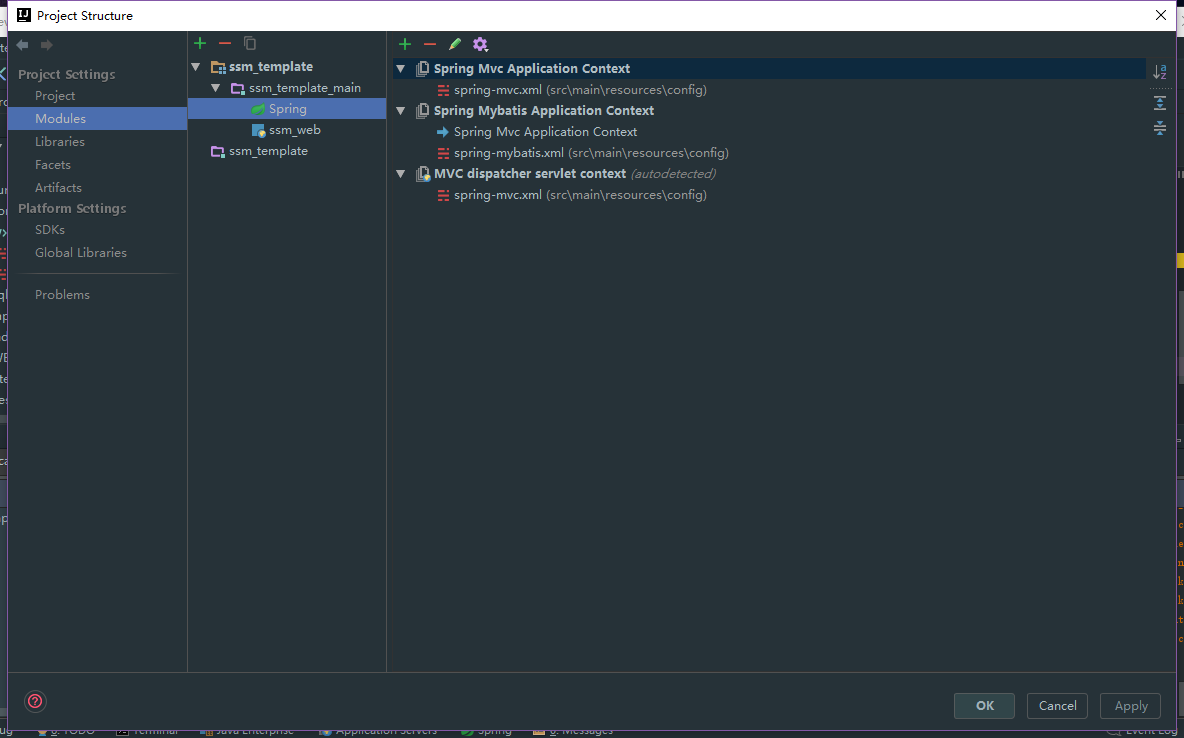
6.Spring MVC配置文件spring-mvc.xml[^spring application context设置]

配置文件的目录设置在web.xml中的contextConfigLocation

1
2
3
4
5
6
7
8
9
10
11
12
13
14
15
16
17
18
19
20
21
22
23
24
25
<?xml version="1.0" encoding="UTF-8"?>
<beans xmlns="http://www.springframework.org/schema/beans"
xmlns:xsi="http://www.w3.org/2001/XMLSchema-instance"
xmlns:context="http://www.springframework.org/schema/context"
xmlns:mvc="http://www.springframework.org/schema/mvc"
xsi:schemaLocation="http://www.springframework.org/schema/beans http://www.springframework.org/schema/beans/spring-beans.xsd http://www.springframework.org/schema/context http://www.springframework.org/schema/context/spring-context.xsd http://www.springframework.org/schema/mvc http://www.springframework.org/schema/mvc/spring-mvc.xsd">
<!-- 自动扫描包,实现支持注解的IOC ,设置要扫描的包,一般含controller类的包-->
<context:component-scan base-package="com.xuan.web.controller" />

<!-- Spring MVC不处理静态资源 -->
<mvc:default-servlet-handler />

<!-- 支持mvc注解驱动 -->
<mvc:annotation-driven />

<!-- 视图解析器 -->
<bean
class="org.springframework.web.servlet.view.InternalResourceViewResolver"
id="internalResourceViewResolver">
<!-- 前缀,设置页面的目录 -->
<property name="prefix" value="/" />
<!-- 后缀,页面的后缀 -->
<property name="suffix" value=".jsp" />
</bean>
</beans>

7. DispatcherServlet配置文件dispatcher-servlet.xml[^spring servlet Application context设置]

1
2
3
4
5
6
<?xml version="1.0" encoding="UTF-8"?>
<beans xmlns="http://www.springframework.org/schema/beans"
xmlns:xsi="http://www.w3.org/2001/XMLSchema-instance"
xsi:schemaLocation="http://www.springframework.org/schema/beans http://www.springframework.org/schema/beans/spring-beans.xsd">

</beans>

测试

index.jsp文件

1
2
3
4
5
6
7
8
9
<%@ page contentType="text/html;charset=UTF-8" language="java" %>
<html>
<head>
<title>$Title$</title>
</head>
<body>
<a href="test.html">进入web测试页面</a>
</body>
</html>

test.jsp文件

1
2
3
4
5
6
7
8
9
<%@ page contentType="text/html;charset=UTF-8" language="java" %>
<html>
<head>
<title>$Title$</title>
</head>
<body>
springmvc配置成功
</body>
</html>

TestController.java

1
2
3
4
5
6
7
@Controller
public class TestController {
@RequestMapping("test.html")
public ModelAndView totestPage(){
return new ModelAndView("test.jsp");
}
}
spring简单测试流程
1
2
3
4
5
6
7
8
9
10
11
index=>start: index.jsp请求test.html
DispatcherServlet=>operation: DispatcherServlet.java过滤找到分配到指定前端控制器(需要配置xml)
TestController=>operation: 前端控制器TestController.java
mvc=>operation: 后台业务逻辑(跳转逻辑)
modelAndView=>operation: 返回modelAndView
page=>operation: 前台页面test.jsp展示数据
e=>end
index->DispatcherServlet->TestController->mvc->modelAndView->page->cond


参考:

Spring学习(二)——使用Gradle构建一个简单的Spring MVC Web应用程序

[^spring application context设置]: Project Structure->Modules->项目名->Spring->+->{name:"取个名字";选择设置的文件 }
[^spring servlet Application context设置]: Project Structure->Modules->项目名->Spring->+->{name:"取个名字";选择设置的文件;父设置spring application context}

Project Structure设置

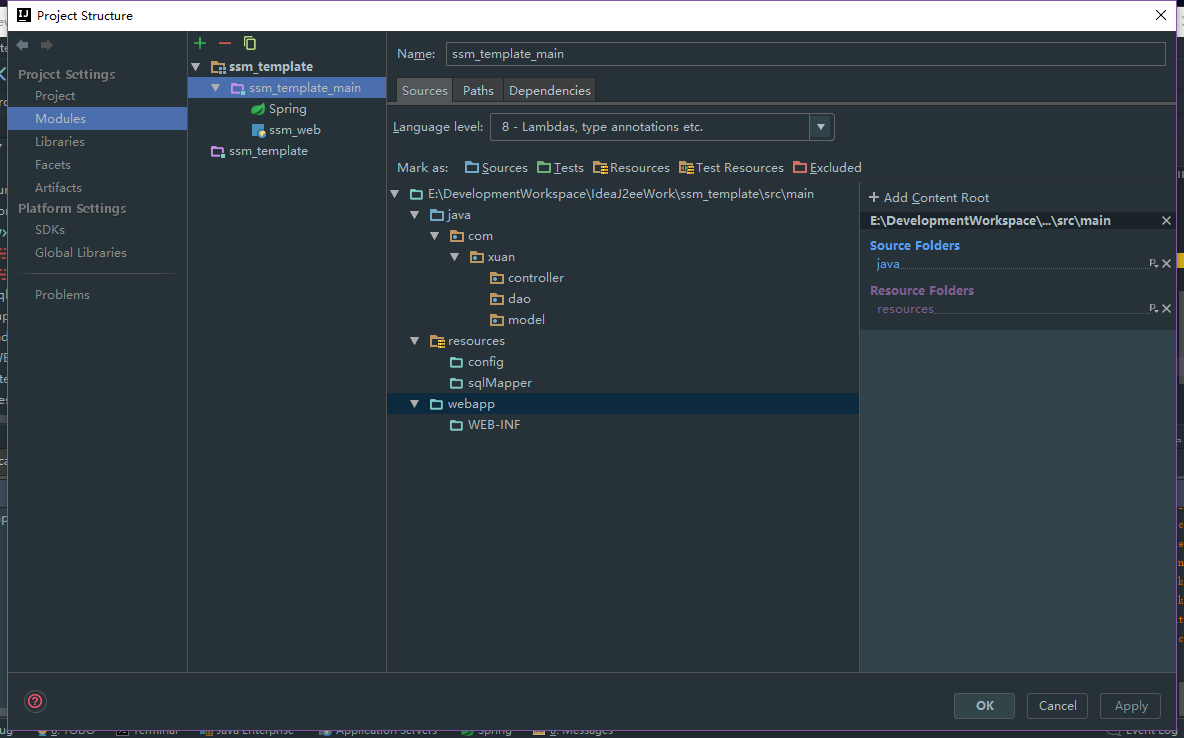
Modules 设置
Sources
1
2
3
4
5
6
7
8
9
10
11
12
—— e:\workspace\test    //工程目录
—— ——.idea
—— ——.settings
—— ——.build
—— —— ——.classes
—— ——META-INF
—— ——out //默认输出目录(设置为Excluded)
—— —— ——artifacts
—— —— —— ——test //编译好的webapp
—— —— ——production
—— ——src //java代码目录(设置为Sources)
—— ——WebContent //web静态代码目录(含js、jsp、html、css...)
Paths

编译输出目录选择默认选项Inherit project….path

Dependencies

添加工程需要jar包,一般在/WebContent/WEB-INF/lib,必须添加tomcat的library,不然servlet着不到包

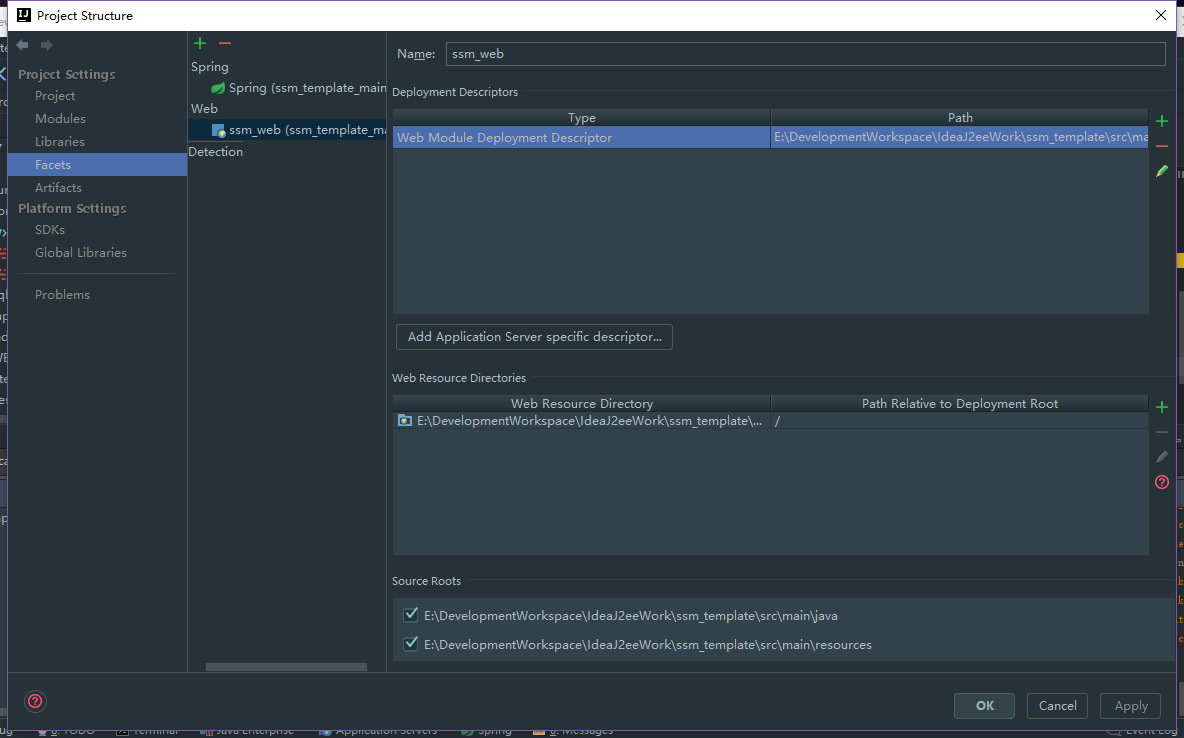
Facets 设置

添加Web选择自己的项目

  • 更改Deployment Descriptors为自己项目的web.xml路径(/WebContent/WEB-INF/web.xml
  • 更改Web Resource Directories为自己项目的web资源目录(.../WebContent) path … root 设置为/根目录
  • Source Roots勾选…/src路径
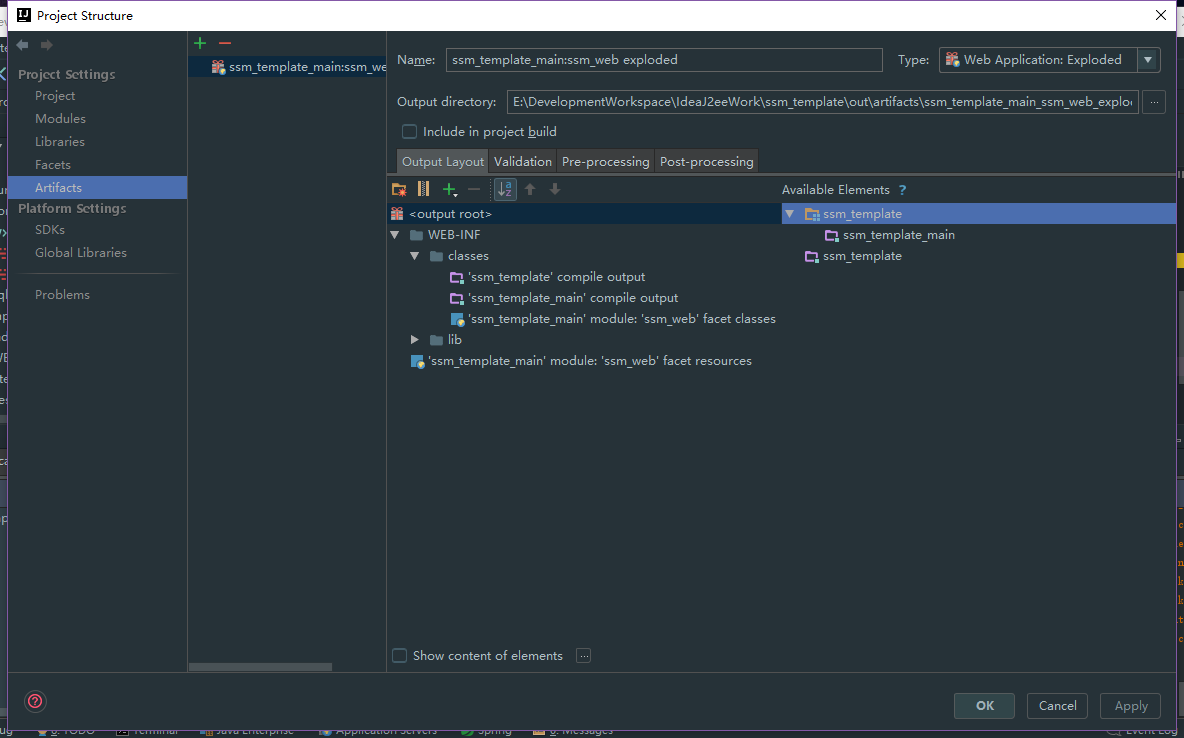
Artifacts

设置webapp发布部署输出目录

添加Web Application:Exploded

output directory: c:\develop\tomcat\webapp\test

1
2
3
4
5
6
7
——output root    //这个是output directory设置的目录
—— ——WEB-INF
—— —— ——classes
—— —— —— ——'test' compile output //项目Java编译src中java输出class的目录
—— —— ——lib //jar包目录
—— ——'test' module:'web' facet resources //设置facet resources 为自己的web目录(/WebContent)
//Available Elements(右边)是提示,可以双击直接在右边生成建议目录,设置了test下没有二级目录

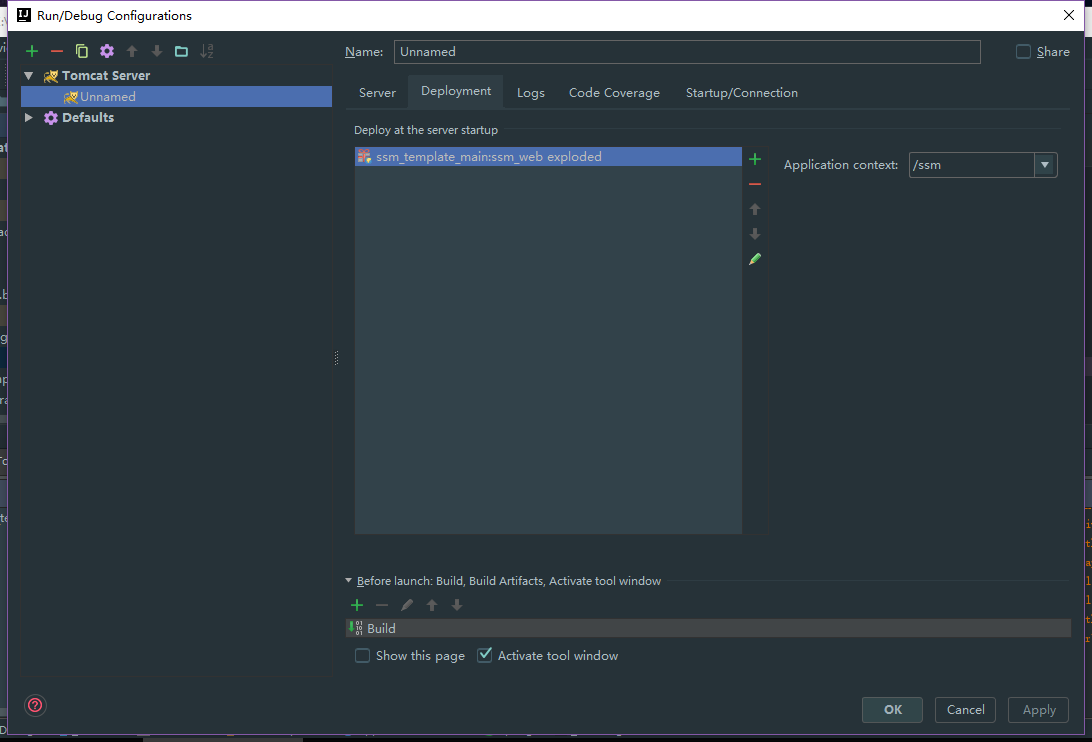
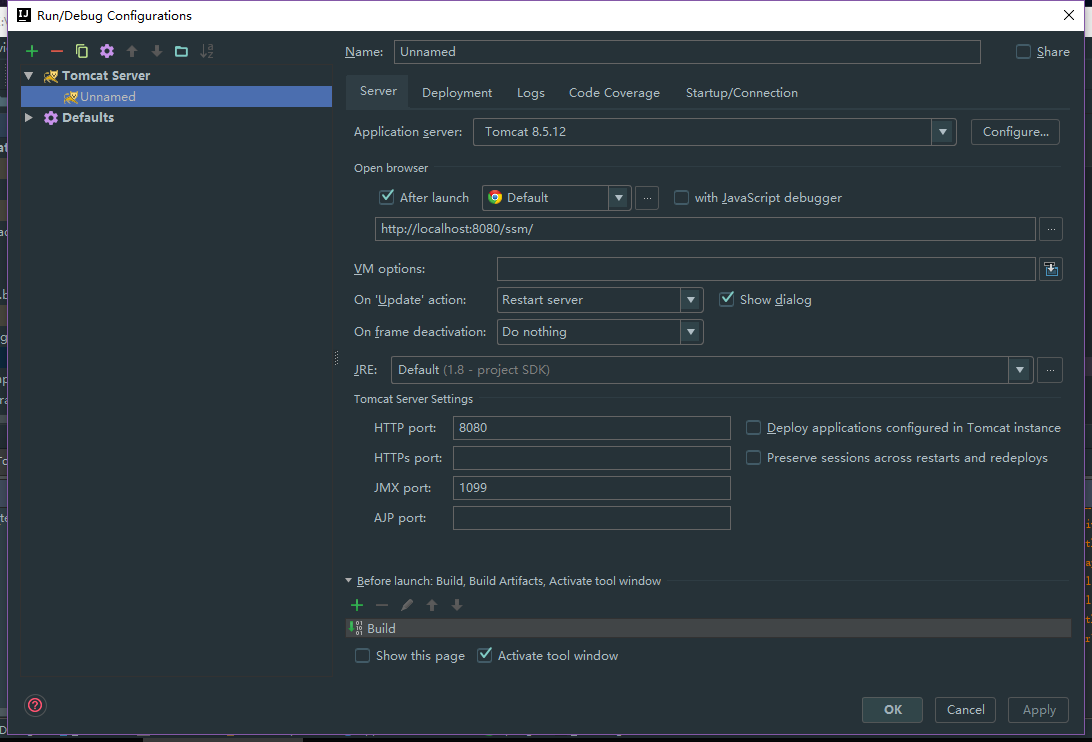
配置运行tomcat Server

Run/Debug Configurations设置
Server 默认
Deployment
  • 点击+,添加要运行的test项目
  • application context 设置为/test

访问地址localhost:8080/testhttp://127.0.0.1:8080/test

eclipse java web项目导入到idea

创建工程

Gradle->[Java,Web]->[GroupId:com.xuan,Artifactld:projectName]->[Use auto-import,Creat dir…..lly]

添加测试

选中要测试的->ctrl+shift+t

被测试代码

1
2
3
4
5
6
public class JunitHello {
public String printHello(){
System.out.printf("hello junit");
return "hello junit";
}
}

测试代码(目录test/java下有效)

1
2
3
4
5
6
7
public class JunitHelloTest {
@Test
public void printHello() throws Exception {
JunitHello junitHello=new JunitHello();
assertEquals(junitHello.printHello(),"hellojunit");
}
}

测试结果

1
2
3
4
5
6
7
8
9
hello junit
org.junit.ComparisonFailure:
Expected :hello junit
Actual :hellojunit
<Click to see difference>

at com.xuan.test.JunitHelloTest.printHello(JunitHelloTest.java:14)

Process finished with exit code -1
注意

自动导入了junit的包、测试代码只能在\test目录下才能使用,不然招不到junit的包,不需要添加JUnitGenerator V2.0自动生成测试模块插件

mvc目录结构

模块内分mvc层,mvc层内分模块

eg:下面介绍以功能模块(model)进行mvc分层,类的命名以功能模块名字Dao.java命名

dao

ModelDao.java文件结构如下

1
2
3
4
5
6
7
8
9
10
11
12
13
14
15
16
17
18
19
20
package com.xuan.goods.model.dao;

import org.apache.commons.dbutils.QueryRunner;
import org.apache.commons.dbutils.handlers.BeanHandler;
import cn.itcast.jdbc.TxQueryRunner;
import com.xuan.goods.model.domain.Model;
/***
*模块持久层, 操作数据库
*/
public class ModelDao{
private QueryRunner qr=new TxQueryRunner();
/**
*抛出异常
*/
public Model findByName(String name)throws SQLException{
String sql="select result from model where name=?"; //数据库语句
//?的值为第三个name参数值,多个问号依次像后面增加参数
return qr.query(sql, new BeanHandler<Model>(Model.class),name);
}
}
domain

Model.java文件结构如下

1
2
3
4
5
6
7
8
9
10
11
12
13
14
15
16
17
18
19
20
21
22
23
24
package com.xuan.goods.model.domain;
/**
*实体层
*/
public class Model{
//对应数据库
private String uid;//主键
private String name;//名字
public String getUid() {
return uid;
}
public void setUid(String uid) {
this.uid = uid;
}
/**
*get方法可以在jsp页面里直接用标签引用获得值,${model.name}
*/
public String getName() {
return name;
}
public void setName(String name) {
this.name = name;
}
}
service

ModelService.java文件结构如下

1
2
3
4
5
6
7
8
9
10
11
12
13
14
15
16
17
18
19
20
21
22
package com.xuan.goods.user.service;
/***
*业务逻辑层
*/
public class ModelService{
private ModelDao modelDao=new ModelDao(); //连接数据库操作层
/**
*业务逻辑
*/
public Model findModel(String name) throw ModelException{
Model model=modelDao.findByName(name);
if (model=null){
//将错误转换为自定义异常ModelException自定义异常类只需要extends Exception这个类
throw new ModelException("未找到模块!");
}
try{
return model;
}catch(SQLException e){
throw new RuntimeException(e);//转换异常,并传递异常
}
}
}
web

servlet 包下ModelServlet.java文件结构如下

1
2
3
4
5
6
7
8
9
10
11
12
13
package com.xuan.goods.model.web.servlet;
/***
*页面显示层
*/
public class ModelServlet extends BaseServlet{
private ModelService modelService=new ModelService(); //连接业务逻辑层
public string findName(HttpServletRequest req, HttpServletResponse resp)
throws ServletException, IOException {
String name = req.getParameter("name"); // 获取名
Model model = modelService.findModel(name);// 通过service得到结果
req.setAttribute("model", model); // 保存成功信息,转发到msg.jsp显示,jsp页面里直接用标签引用获得值,${model.name}
return "f:/jsps/msg.jsp"; // 转发到页面
}

代码见goods项目

MySQL安装

  1. 下载MySQL Community Server 5.7.17文件名

  2. 安装目录C:\Develop\mysql-5.7.17-winx64

  3. 设置工作目录复制my-default.ini重命名为my.ini修改里面

    1
    2
    3
    # These are commonly set, remove the # and set as required.
    basedir = "C:\Develop\mysql-5.7.17-winx64"
    datadir = "E:\DevelopmentWorkspace\mysql-5.7.17-workspase"
    注:其中 basedir=你的mysql目录,datadir=数据存放目录
  4. 管理员身份运行cmd,切换到C:\Develop\mysql-5.7.17-winx64\bin执行mysqld -install

  5. 执行mysqld --initialize 如果执行错误,删除数据存放目录,重新执行

  6. 运行mysql执行net start mysql

  7. 停止mysql执行net stop mysql

Tomcat 安装

  1. 下载apache-tomcat-8.5.12-windows-x64
  2. 安装目录C:\Develop\apache-tomcat-8.5.12

idea 安装

  1. 下载ideaIU-2016.3.5.exe
  2. 安装目录[C:\Develop\IntelliJ IDEA 2016.3.5](C:\Develop\IntelliJ IDEA 2016.3.5)
  3. 智能提示忽略大小写Editor->General->Code Completion:{Casesensitive completion:None}
  4. 取消自动打开上次的项目Appearance->System Settings:{Reopen last project on startup:false}
美化
  1. 安装Material Theme UI插件
  2. 下载主题样式http://color-themes.com
  3. 导入主题Ladies Night 2: File->Import Settings...

eclipse 安装

1.下载https://eclipse.org/

环境搭建

  1. 下载nodejs,并安装,安装过程默认(可修改路径),成功校验(npm -version)

    Javascript的运行环境,这里主要使用npm附属插件(包管理)

  2. npm install -g cordova 安装cordova

    混合开发环境,Cordova提供了js和原生API的调用接口,通过插件,我们可以实现例如拍照,扫码等操作; 并且提供了静态文件转换成APP的功能。

  3. npm install -g cordova ionic安装ionic

    Ionic 是基于 Cordova 的,在 Cordova 上能用的一切同样可以在 Ionic 上使用
    Ionic 在 Cordova 基础上增加了 Ionic UI、AngularJS、一个强大的 CLI 工具和一些云端服务等

快速入门

  1. JavaScript代码可以直接嵌在网页的任何地方,通常放到<head>

  2. <script>...</script>包裹代码

  3. 引入文件<script src="/src/js/xx.js"></script>

  4. alert('hello world');对话框

  5. console.log(var类型); 调试输出打印: 浏览器->右键->检查->Console

  6. 严格区分大小写

  7. ==自动转换数据类型再比较(缺陷),===先比较类型,在比较数据(比较完善)注:NaN(0/0;//NaN)是个特殊的Number,NaN===NaN;//false 应该用isNaN(NaN)

  8. 数组 var arr=[1,2,3.14,"helll",null,true];//可以是任意类型

  9. 对象

    1
    2
    3
    4
    5
    6
    7
    8
    9
    10
    11
    12
    13
    14
    var person={
    name:'xx',
    age:20,
    skill:['js','java','c'],
    hasCar: true,
    zipcode: null
    };//类似json字符串
    person.name; //值为'xx'
    person.tags[0];//值为'js'
    console.log(person); //调试打印出对象
    person.book='hello'; //新增一个book属性
    delete.person.book;//删除book属性
    'name' in person;// 返回true,判断person是否拥有name属性
    person.hasOwnProperty('name'); //true判断一个属性是否是person自身拥有的,而不是继承得到的
  10. 全局变量i=10;//i是全局变量 会造成混乱这是一缺陷,弥补缺陷方法加 'use strict';//需要浏览器支持,如果用了i=10;,将出现ReferenceError错误

  11. 转义字符串 'I\'m \"ok\"!; //字符串内容I'm "ok"!

  12. 多行字符串 `这是一个多行字符串`;//替代了\n

  13. 模板字符串

    1
    2
    3
    4
    var name="xx";
    var age=20;
    var message='你好,${name},年龄${age}'; //模板字符串法,需要浏览器支持
    var message='你好,'+name+',年龄'+age; //两者等效
  14. 字符串操作

    1
    2
    3
    4
    5
    6
    7
    8
    9
    10
    11
    var s='hello world!';
    s.length; //字符串长度
    s[0];//'h'
    s[5];//' '
    s[11];//'!'
    s[0]='x';//'h' 只可读(赋值是不成功的)
    s=s.toUpperCase();//'HELLO WORLD!' 转换为大写
    s=s.toLowerCase();//转换为小写
    s.indexOf('wo');//返回它的位置6,如果没有wo则返回-1
    s.substring(0,5);//从0开始到5结束(不包括5),'hello'
    s.substring(7);//从7开始到结束 'orld!'
  15. 数组

    1
    2
    3
    4
    5
    6
    7
    8
    9
    10
    11
    12
    13
    14
    15
    16
    17
    18
    19
    20
    21
    22
    23
    24
    25
    26
    27
    28
    29
    30
    31
    32
    33
    34
    var arr=[1,'a',2];
    arr.length; //3
    arr.length=2; //[1,'2']
    arr.length=4; //[1,'2',undefined,undefined]
    arr[2]=3;//[1,'2',3,undefined]
    arr[4]=6;//[1,'2',3,undefined,6]
    arr.slice(0,3); //等效于substring
    var arrCopy= arr.slice(); //从头到尾复制数组
    var arr=[1,2];
    arr.push('a','b'); //返回长度4
    arr;//[1,2,'a','b']
    arr.pop(); //返回'b'
    arr;//[1,2,'a']
    arr.unshift('A'); //返回长度4
    arr;//['A',1,2,'a']
    arr.sort(); //默认规则(0-9,A-Z,a-z)排序
    arr;//[1,2,A,a]
    arr.shift(); //'1'
    arr;//[2,A,'a']
    arr.reverse();
    arr;//['a',A,2] 反转
    //从索引1开始删除2个元素,然后再添加2个元素
    arr.splice(1,2,'b','c');//返回[A,2]
    arr;//[a,b,c]
    var arr2=[1,2,3];
    var added=arr2.concat(arr); //连接
    added;//[1,2,3,a,b,c]
    arr2;//[1,2,3]
    arr;//[a,b,c]
    var arr = ['A', 'B', 'C'];
    arr.concat(1, 2, [3, 4]); //返回['A', 'B', 'C', 1, 2, 3, 4]
    arr.join('-');//'A-B-C'
    var arr=[[1,2,3],[4,5,6],'-']; //多维数组把数组看成一个元素
    arr[1][2];//6
  16. 循环for (var ? in ?){}

    1
    2
    3
    4
    5
    6
    7
    8
    9
    10
    11
    12
    13
    14
    15
    var o={
    name:'xx',
    age:20,
    city:'cq'
    };
    //可以把一个对象的所有属性依次循环出来
    for(var key in o){
    alert(key); //'name','age','city'
    }
    var a=['A','B','C'];
    //由于Array也是对象,而它的每个元素的索引被视为对象的属性
    for(var i in a){
    alert(i); //'0','1','2'
    alert(a[i]); //'A','B','C'
    }
  17. Map是一组键值对的结构,具有极快的查找速度。

    1
    2
    3
    4
    5
    6
    7
    var m=new Map([['oo',100],['xx',99],['qq',21]]);
    m.get('oo');//100
    var mm=new Map(); //空Map
    mm.set('aa',12); //添加键值对
    mm.has('ss'); //是否存在key 'ss',不存在false
    mm.get('aa'); //获取key 'aa'的值12
    mm.delete('aa'); //删除'aa'键值对
  18. Set:SetMap类似,也是一组key的集合,但不存储value。

    1
    var s1=new Set([1,2,3,3]); //重复key字动过滤
  19. iterable ArrayMapSet都属于iterable类型。

    1
    2
    3
    4
    5
    6
    7
    8
    9
    10
    11
    12
    13
    14
    15
    16
    17
    18
    19
    20
    21
    22
    23
    var a=['A','B','C'];
    for(var x of a){ //遍历Array,Set,Map都可以
    alert(x); //'A','B','C'
    }
    a.name='hello';
    for(var x in a){
    alert(x); //'0','1','2','name'
    }
    //for ... in循环将把name包括在内,但Array的length属性却不包括在内。
    //for ... of循环则完全修复了这些问题,它只循环集合本身的元素。
    a.forEach(function (element,index,array)){
    //element: 指向当前元素的值
    //index:指向当前索引(可省略)
    //array:指向array对象本身(可省略)
    }
    var s = new Set(['A', 'B', 'C']);
    s.forEach(function (element, sameElement, set) {
    alert(element);
    });
    var m = new Map([[1, 'x'], [2, 'y'], [3, 'z']]);
    m.forEach(function (value, key, map) {
    alert(value);
    });