0%

安装

安装IngressNginxController见K8s安装Kuboard

配置支持websocket

  1. 部署netty服务端,相关代码见iexxk/springLeaning-netty

  2. 修改服务的Ingress,关键点添加注解nginx.org/websocket-services

    1
    2
    3
    4
    5
    6
    7
    8
    9
    10
    11
    12
    13
    14
    15
    16
    17
    18
    19
    20
    21
    22
    23
    24
    25
    26
    27
    28
    29
    30
    31
    ---
    apiVersion: networking.k8s.io/v1
    kind: Ingress
    metadata:
    annotations:
    nginx.org/websocket-services: netty #添加该句,netty对应下面的服务名
    labels:
    k8s.kuboard.cn/name: netty
    name: netty
    namespace: exxk
    resourceVersion: '919043'
    spec:
    ingressClassName: myingress
    rules:
    - host: netty.iexxk.io
    http:
    paths:
    - backend:
    service:
    name: netty
    port:
    number: 8080
    path: /test
    pathType: Prefix
    - backend:
    service:
    name: netty #服务名
    port:
    number: 8081 #netty的端口
    path: /ws #匹配规则
    pathType: Prefix
  3. 测试,通过postman,点击new->WebSocket,填入netty.iexxk.io/ws,点击连接就可以发送消息了

问题
  1. 通过返回的消息,可以发现ingress消息返回的客户端ip是ingress-nginx的pod的容器ip,通过host/nodePort的形式发现可以拿到客户端真实的ip,因此想要拿到客户端ip可能还需要额外配置其他的配置。

    1
    2
    3
    4
    5
    6
    7
    #---通过ingress---netty.iexxk.io/ws----------------
    接收的消息:[10-234-216-40.ingress-nginx-controller-myingress.ingress-nginx.svc.cluster.local][12:29:59] ==> 123123
    发送的消息:123123

    #---通过hostPort/nodePort----172.16.30.165:30081/ws---------
    接收的消息:[172.16.10.168][12:29:56] ==> 2312
    发送的消息:2312
  2. 问题ingress上传文件时报413POST /api/.. HTTP/1.1" 413,请求体过大

    解决:1. 局部设置在项目的ingress下(也就是域名下)添加注解nginx.ingress.kubernetes.io/proxy-body-size设置值为100m,在kuboard界面点击namespace=>Applications=>Ingress=>edit=>注解=>下拉选择proxy-body-size

    1. 全局设置未成功

kuboard权限(可以不设置,只建立组)

kuboard的权限是指可以看到那些集群,针对的是集群管理相关的角色,他有两个类型的角色设定。

  1. RoleBindings at global level默认有三个角色
    • administrator: 管理员
    • sso-user
    • viewer:只读用户,看不到secript
  2. ClusterRoleBingding:这个是针对某个集群有什么权限

Kuboard的权限可以不用设置,直接通过集群内部的权限进行设置,如果设置了,内部集群的权限小于外部的,内部就无法进行精细话控制,会产生两个冲突的权限。1和2一起设置,进入集群前就有两种角色选择其中一个进入集群。

Cluster Access Control

集群内部权限,选了集群过后进行设置。

  1. phase1-auth:第一阶段授权和kuboard的ClusterRoleBingding是同一个东西。都是针对集群设置主角色。
  2. phase2-auth: 第二阶段授权,是进行精细话控制能访问k8s那些api,在这里可以控制隐藏config、secript等配置api,这里的配置主体都是一个命名空间一个配置。

各大方案工具对比

手动

通过目录和git版本控制共同管理,sql根据版本按顺序执行,增量的时候可以通过变量记录上次执行到了那个阶段,防止重复执行。

1
2
3
4
5
6
7
8
9
10
11
12
13
14
15
16
17
Example.DataSchema
├─V1.0
│ ├─Common
│ │ 001.Create.Table.Product.sql
│ │ 002.Create.Table.User.sql
│ ├─Enterprise
│ │ 001.Create.Table.Highland.sql
│ └─Professional
│ 001.Create.Table.Lowend.sql
├─V1.1
│ ├─Common
│ │ 001.Alter.Table.User.sql
│ │ 002.Drop.Function.USP_CleanFeedback.sql
│ ├─Enterprise
│ │ 001.Alter.Table.Highland.sql
│ └─Professional
│ 001.Alter.Table.Lowend.sql

Flyway

相关文档:Flyway快速上手教程

通过依赖的方式引入springboot,而且有对应的maven插件,以及相关sql记录会记录到数据库,主要分V和R,R可以重复执行,V只能执行一次。

Liquibase

通过maven插件,功能较多,功能复杂

Bytebase

阿里 DMS

Flyway 通过maven依赖的形式
https://www.jianshu.com/p/567a8a161641

Liquibase 支持maven支持客户端

https://www.cnblogs.com/nevermorewang/p/16185585.html

Bytebase

https://www.modb.pro/db/621194

基础命令对比

命令 docker ctr(containerd) crictl(k8s)
查看运行的容器 docker ps ctr task ls/ctr container ls crictl ps
查看镜像 docker images ctr image ls crictl images
查看容器日志 docker logs crictl logs
查看容器数据信息 docker inspect ctr container info crictl inspect
查看容器资源 docker stats crictl stats
启动/关闭已有的容器 docker start/stop ctr task start/kill crictl start/stop
运行一个新的容器 docker run ctr run
修改镜像标签 docker tag ctr image tag
创建一个新的容器 docker create ctr container create crictl create
导入镜像 docker load ctr image import
导出镜像 docker save ctr image export
删除容器 docker rm ctr container rm crictl rm
删除镜像 docker rmi ctr image rm crictl rmi
拉取镜像 docker pull ctr image pull crictl pull
推送镜像 docker push ctr image push
在容器内部执行命令 docker exec crictl exec

配置镜像加速

方案零

采用镜像代理服务商,一般直接将原镜像更名即可,例如:docker pull gcr.io/kaniko-project/executor:debug修改成docker pull gcr.lank8s.cn/kaniko-project/executor:debug

  1. lank8s

    原始仓库 lank8s服务
    registry.k8s.io(原k8s.gcr.io) registry.lank8s.cn
    registry.k8s.io lank8s.cn
    gcr.io gcr.lank8s.cn

方案一(采用)

  1. 修改/etc/containerd/config.toml文件,在endpoint = ["https://registry-1.docker.io"] 添加"https://xxx.mirror.aliyuncs.com"得到endpoint = ["https://xxx.mirror.aliyuncs.com","https://registry-1.docker.io"],添加在前面,优先用阿里云加速仓库。

    1
    2
    3
    4
    5
    6
    7
    .......
    [plugins."io.containerd.grpc.v1.cri".containerd.runtimes.runc.options]
    systemdCgroup = true
    [plugins."io.containerd.grpc.v1.cri".registry]
    [plugins."io.containerd.grpc.v1.cri".registry.mirrors]
    [plugins."io.containerd.grpc.v1.cri".registry.mirrors."docker.io"]
    endpoint = ["https://xxx.mirror.aliyuncs.com","https://registry-1.docker.io"]
  2. 重启服务systemctl daemon-reloadsystemctl restart containerd

方案二(报错)

  1. 修改/etc/containerd/config.toml文件,在[plugins."io.containerd.grpc.v1.cri".registry]一行下面添加config_path = "/etc/containerd/certs.d"。示例如下
1
2
3
4
5
6
7
8
.......
[plugins."io.containerd.grpc.v1.cri".containerd.runtimes.runc.options]
systemdCgroup = true
[plugins."io.containerd.grpc.v1.cri".registry]
config_path = "/etc/containerd/certs.d" //添加这一句
[plugins."io.containerd.grpc.v1.cri".registry.mirrors]
[plugins."io.containerd.grpc.v1.cri".registry.mirrors."docker.io"]
endpoint = ["https://registry-1.docker.io"]
  1. 创建目录/etc/containerd/certs.d/docker.io,创建/etc/containerd/certs.d/docker.io/hosts.toml文件。
1
2
3
4
[root@exxk ~]# cat /etc/containerd/certs.d/docker.io/hosts.toml
server = "https://docker.io"
[host."https://xxx.mirror.aliyuncs.com"]
capabilities = ["pull","resolve"]
  1. 重启服务systemctl daemon-reloadsystemctl restart containerd

  2. 其他加速同理

    1
    2
    3
    4
    5
    6
    7
    8
    9
    10
    11
    12
    13
    14
    $ tree /etc/containerd/certs.d
    /etc/containerd/certs.d/
    ├── docker.io
    │ └── hosts.toml
    └── quay.io
    └── hosts.toml

    $ cat /etc/containerd/certs.d/docker.io/hosts.toml
    server = "https://docker.io"
    [host."https://xxxx.mirror.aliyuncs.com"]

    $ cat /etc/containerd/certs.d/quay.io/hosts.toml
    server = "https://quay.io"
    [host."https://xxx.mirrors.ustc.edu.cn"]
  3. 执行crictl pull nacos/nacos-server:v2.2.3报错

    1
    2
    3
    4
    [root@exxk ~]# crictl pull docker.io/nacos/nacos-server:v2.2.3
    FATA[0000] validate service connection: CRI v1 image API is not implemented for endpoint "unix:///var/run/containerd/containerd.sock": rpc error: code = Unimplemented desc = unknown service runtime.v1.ImageService
    [root@exxk ~]# crictl pull nacos/nacos-server:v2.2.3
    FATA[0000] validate service connection: CRI v1 image API is not implemented for endpoint "unix:///var/run/containerd/containerd.sock": rpc error: code = Unimplemented desc = unknown service runtime.v1.ImageService

配置私有仓库

  1. 修改/etc/hosts,映射harbor.exxktech.dev到harbor内网服务ip。

  2. 修改/etc/containerd/config.toml文件,重启服务systemctl daemon-reloadsystemctl restart containerd

1
2
3
4
5
6
7
8
9
    [plugins."io.containerd.grpc.v1.cri".registry]
[plugins."io.containerd.grpc.v1.cri".registry.mirrors]
[plugins."io.containerd.grpc.v1.cri".registry.mirrors."docker.io"]
endpoint = ["https://rq98iipq.mirror.aliyuncs.com","https://registry-1.docker.io"]
#下面是新加的
[plugins."io.containerd.grpc.v1.cri".registry.mirrors."harbor.exxktech.dev"]
endpoint = ["http://harbor.exxktech.dev"]
[plugins."io.containerd.grpc.v1.cri".registry.configs."harbor.exxktech.dev".tls]
insecure_skip_verify = true

安装

  1. 在Mac或其他机器安装管理工具kuboard-spray

    1
    2
    3
    4
    5
    6
    7
    8
    docker run -d \
    --privileged \
    --restart=unless-stopped \
    --name=kuboard-spray \
    -p 80:80/tcp \
    -v /var/run/docker.sock:/var/run/docker.sock \
    -v ~/kuboard-spray-data:/data \
    eipwork/kuboard-spray:latest-amd64
  2. 访问http://localhost/#/login,输入用户名 admin,默认密码 Kuboard123,即可登录 Kuboard-Spray 界面。

  3. 点击Add Cluster Installation Plad输入集群名称,选择spray-v2.21.0c_k8s-v1.26.4_v4.4-amd64点击OK

  4. 点击Add Node添加一个节点,勾选control planeetcd nodeworker node点击OK。

  5. 右侧输入安装节点的ip=172.16.3.165,端口,密码,最底部输入etcd的名字etcd_exxk,点击Validate Connection

  6. 最后点击save,然后点击Install/Setup K8S Cluster按钮进行安装。

  7. 等待安装完成,失败可以重复6

  8. 访问http://172.16.3.165默认用户名: admin默认密 码: Kuboard123

配置

方案一 :修改Kuboard端口

  1. 找到Kuboard的部署配置文件,vi /etc/kubernetes/manifests/kuboard.yaml修改

    1
    2
    3
    4
    5
    6
    7
    8
    9
    - env:
    - name: KUBOARD_ENDPOINT
    value: "http://172.16.3.165:14001" #把80修改为14001
    name: kuboard
    ports:
    - containerPort: 80
    hostPort: 14001 #hostPort修改为14001
    name: web
    protocol: TCP
  2. 保存,等待自动重启。

    知识点:static-pod静态 Pod 在指定的节点上由 kubelet 守护进程直接管理,不需要 API 服务器监管。 与由控制面管理的 Pod(例如,Deployment) 不同;kubelet 监视每个静态 Pod(在它失败之后重新启动)。

    特点:更改配置自动重启pod,无法删除pod,只能把配置文件移除目录才能删除,默认静态pod目录/etc/kubernetes/manifests

方案二:修改Kuboard走ingress-nginx(失败,能访问界面,但是bash相关功能用不了)

  1. 在Kuboard管理界面的Kuboard命名空间创建service

    1
    2
    3
    4
    5
    6
    7
    8
    9
    10
    11
    12
    13
    14
    15
    16
    apiVersion: v1
    kind: Service
    metadata:
    labels:
    k8s.kuboard.cn/name: kuboard-v3
    name: kuboard-v3
    namespace: kuboard
    spec:
    ports:
    - protocol: TCP
    port: 80
    targetPort: 80
    selector:
    k8s.kuboard.cn/name: kuboard-v3
    type: ClusterIP

  2. 在Kuboard管理界面的Kuboard命名空间创建Ingress

    1
    2
    3
    4
    5
    6
    7
    8
    9
    10
    11
    12
    13
    14
    15
    16
    17
    18
    19
    20
    apiVersion: networking.k8s.io/v1
    kind: Ingress
    metadata:
    labels:
    k8s.kuboard.cn/name: kuboard-v3
    name: kuboard
    namespace: kuboard
    spec:
    ingressClassName: myingresscontroller #需要先安装IngressNginxController,使用安装时候的名字
    rules:
    - host: kuboard.iexxk.io #安装时候的域名后缀
    http:
    paths:
    - backend:
    service:
    name: kuboard-v3
    port:
    number: 80
    path: /
    pathType: Prefix
  3. 找到Kuboard的部署配置文件,vi /etc/kubernetes/manifests/kuboard.yaml修改

    1
    2
    3
    4
    5
    6
    7
    8
    9
    10
    11
    ....省略其他配置
    - env:
    - name: KUBOARD_ENDPOINT
    value: "http://172.16.3.165:14001" #把172.16.3.165:80修改为kuboard.iexxk.io
    name: kuboard
    ports:
    - containerPort: 80
    # hostPort: 14001 #hostPort这一行删除
    name: web
    protocol: TCP
    .....省略
  4. 保存,等待自动重启。

    知识点:

    1. 本来想用静态pod的方式配置,发现添加到配置文件不生效,后来只能在界面的模式添加。

    2. IngressNginxController简单来说就是一个nginx,进入pod容器里面可以看到nginx的相关配置,在使用服务配置了ingress后,会自动在ingress的pod里面生成相应的nginx配置,样例如下:

      1
      2
      3
      4
      5
      6
      7
      8
      9
      10
      11
      12
      13
      14
      15
      16
      17
      18
      19
      20
      21
      22
      23
      24
      25
      26
      27
      28
      29
      30
      31
      32
      33
      34
      35
      36
      37
      38
      39
      40
      41
      42
      43
      44
      45
      46
      47
      48
      49
      50
      51
      52
      53
      54
      55
      56
      57
      58
      59
      60
      61
      62
      63
      64
      65
      66
      67
      68
      69
      70
      71
      72
      73
      74
      75
      76
      77
      78
      79
      80
      81
      82
      83
      84
      85
      86
      87
      88
      89
      90
      91
      92
      93
      94
      95
      96
      97
      98
      99
      100
      101
      102
      103
      104
      105
      106
      107
      108
      109
      110
      111
      112
      113
      114
      115
      116
      117
      118
      119
      120
      121
      122
      123
      124
      125
      126
      127
      128
      129
      130
      131
      132
      133
      134
      135
      ## start server web.iexxk.io
      server {
      server_name web.iexxk.io ;

      listen 80 ;
      listen [::]:80 ;
      listen 443 ssl http2 ;
      listen [::]:443 ssl http2 ;

      set $proxy_upstream_name "-";

      ssl_certificate_by_lua_block {
      certificate.call()
      }

      location / {

      set $namespace "exxk";
      set $ingress_name "web";
      set $service_name "web";
      set $service_port "80";
      set $location_path "/";
      set $global_rate_limit_exceeding n;

      rewrite_by_lua_block {
      lua_ingress.rewrite({
      force_ssl_redirect = false,
      ssl_redirect = true,
      force_no_ssl_redirect = false,
      preserve_trailing_slash = false,
      use_port_in_redirects = false,
      global_throttle = { namespace = "", limit = 0, window_size = 0, key = { }, ignored_cidrs = { } },
      })
      balancer.rewrite()
      plugins.run()
      }

      # be careful with `access_by_lua_block` and `satisfy any` directives as satisfy any
      # will always succeed when there's `access_by_lua_block` that does not have any lua code doing `ngx.exit(ngx.DECLINED)`
      # other authentication method such as basic auth or external auth useless - all requests will be allowed.
      #access_by_lua_block {
      #}

      header_filter_by_lua_block {
      lua_ingress.header()
      plugins.run()
      }

      body_filter_by_lua_block {
      plugins.run()
      }

      log_by_lua_block {
      balancer.log()

      monitor.call()

      plugins.run()
      }

      port_in_redirect off;

      set $balancer_ewma_score -1;
      set $proxy_upstream_name "exxk-web-80";
      set $proxy_host $proxy_upstream_name;
      set $pass_access_scheme $scheme;

      set $pass_server_port $server_port;

      set $best_http_host $http_host;
      set $pass_port $pass_server_port;

      set $proxy_alternative_upstream_name "";

      client_max_body_size 1m;

      proxy_set_header Host $best_http_host;

      # Pass the extracted client certificate to the backend

      # Allow websocket connections
      proxy_set_header Upgrade $http_upgrade;

      proxy_set_header Connection $connection_upgrade;

      proxy_set_header X-Request-ID $req_id;
      proxy_set_header X-Real-IP $remote_addr;

      proxy_set_header X-Forwarded-For $remote_addr;

      proxy_set_header X-Forwarded-Host $best_http_host;
      proxy_set_header X-Forwarded-Port $pass_port;
      proxy_set_header X-Forwarded-Proto $pass_access_scheme;
      proxy_set_header X-Forwarded-Scheme $pass_access_scheme;

      proxy_set_header X-Scheme $pass_access_scheme;

      # Pass the original X-Forwarded-For
      proxy_set_header X-Original-Forwarded-For $http_x_forwarded_for;

      # mitigate HTTPoxy Vulnerability
      # https://www.nginx.com/blog/mitigating-the-httpoxy-vulnerability-with-nginx/
      proxy_set_header Proxy "";

      # Custom headers to proxied server

      proxy_connect_timeout 5s;
      proxy_send_timeout 60s;
      proxy_read_timeout 60s;

      proxy_buffering off;
      proxy_buffer_size 4k;
      proxy_buffers 4 4k;

      proxy_max_temp_file_size 1024m;

      proxy_request_buffering on;
      proxy_http_version 1.1;

      proxy_cookie_domain off;
      proxy_cookie_path off;

      # In case of errors try the next upstream server before returning an error
      proxy_next_upstream error timeout;
      proxy_next_upstream_timeout 0;
      proxy_next_upstream_tries 3;

      proxy_pass http://upstream_balancer;

      proxy_redirect off;

      }

      }
      ## end server web.iexxk.io

安装IngressNginxController

  1. 在集群的 集群管理 –> 网络 –> IngressClass 列表页点击图中的 安装 IngressNginxController 并创建 IngressClass 的按钮,输入名称myingresscontroller

  2. 查看界面上的端口提示信息

    1
    2
    3
    4
    5
    负载均衡映射
    建议使用 Kubernetes 集群外的负载均衡器,对如下端口设置 L4 转发(不能通过 X-FORWARDED-FOR 追溯源地址) 或 L7 转发(部分负载均衡产品配置 L7 转发较繁琐)
    (如果您已完成转发设置,请忽略此消息)。
    负载均衡的 80 端口转发至 Kubernetes 集群任意节点的 32211
    负载均衡的 443 端口转发至 Kubernetes 集群任意节点的 31612
  3. 方案一(比较节约资源,但是80端口被占用,不能做更多的用途),修改容器的hostPort端口为80,然后直接通过域名即可访问。(修改myingresscontroller的no dePort32211端口为80,但是k8s集群的nodePort端口为30000~40000)

  4. 方案二(多搭建了一个nginx服务,但是灵活性更高)

    配置外部nginx,创建一个static-pod的nginx服务。

    /etc/kubernetes/manifests/目录创建一个static-nginx.yaml

    1
    2
    3
    4
    5
    6
    7
    8
    9
    10
    11
    12
    13
    14
    15
    16
    17
    18
    19
    20
    21
    22
    23
    24
    apiVersion: v1
    kind: Pod
    metadata:
    annotations: {}
    labels:
    k8s.kuboard.cn/name: static-nginx
    name: static-nginx
    namespace: ingress-nginx
    spec:
    containers:
    - name: web
    image: nginx:alpine
    ports:
    - name: web
    containerPort: 80
    hostPort: 80
    protocol: TCP
    volumeMounts:
    - mountPath: /etc/nginx/conf.d/default.conf
    name: nginx-conf
    volumes:
    - hostPath:
    path: "/root/static-nginx/nginx.conf"
    name: nginx-conf

    在目录/root/static-nginx创建nginx.conf

    1
    2
    3
    4
    5
    6
    7
    8
    9
    10
    11
    12
    13
    14
    15
    16
    server {
    listen 80;
    server_name .iexxk.io;
    #access_log /var/log/nginx/hoddst.access.log main;

    location / {
    proxy_set_header Host $host;
    proxy_set_header X-Real-IP $remote_addr;
    proxy_set_header X-Forwarded-For $proxy_add_x_forwarded_for;
    proxy_pass http://172.16.3.165:32211/;
    }
    error_page 500 502 503 504 /50x.html;
    location = /50x.html {
    root /usr/share/nginx/html;
    }
    }
  5. 创建个测试web,ingress设置为web.iexxk.io进行访问即可,记得映射域名*.iexxk.io172.16.3.165主机上。

    1
    2
    3
    4
    5
    6
    7
    8
    9
    10
    11
    12
    13
    14
    15
    16
    17
    18
    19
    20
    21
    22
    23
    24
    25
    26
    27
    28
    29
    30
    31
    32
    33
    34
    35
    36
    37
    38
    39
    40
    41
    42
    43
    44
    45
    46
    47
    48
    49
    50
    51
    52
    53
    54
    55
    56
    57
    58
    59
    60
    61
    62
    63
    64
    65
    66
    67
    68
    69
    70
    71
    72
    73
    74
    75
    76
    77
    78
    79
    80
    81
    82
    83
    84
    85
    86
    87
    88
    89
    90
    91
    92
    93
    94
    95
    96
    97
    98
    99
    100
    101
    102
    103
    104
    105
    106
    107
    108
    109
    110
    111
    112
    113
    114
    115
    116
    117
    118
    119
    120
    ---
    apiVersion: apps/v1
    kind: Deployment
    metadata:
    annotations: {}
    labels:
    k8s.kuboard.cn/name: web
    name: web
    namespace: exxk
    resourceVersion: '126840'
    spec:
    progressDeadlineSeconds: 600
    replicas: 1
    revisionHistoryLimit: 10
    selector:
    matchLabels:
    k8s.kuboard.cn/name: web
    strategy:
    rollingUpdate:
    maxSurge: 25%
    maxUnavailable: 25%
    type: RollingUpdate
    template:
    metadata:
    creationTimestamp: null
    labels:
    k8s.kuboard.cn/name: web
    spec:
    containers:
    - image: 'nginx:alpine'
    imagePullPolicy: IfNotPresent
    name: web
    ports:
    - containerPort: 80
    protocol: TCP
    resources: {}
    terminationMessagePath: /dev/termination-log
    terminationMessagePolicy: File
    dnsPolicy: ClusterFirst
    restartPolicy: Always
    schedulerName: default-scheduler
    securityContext: {}
    terminationGracePeriodSeconds: 30
    status:
    availableReplicas: 1
    conditions:
    - lastTransitionTime: '2023-08-30T03:52:17Z'
    lastUpdateTime: '2023-08-30T03:52:17Z'
    message: Deployment has minimum availability.
    reason: MinimumReplicasAvailable
    status: 'True'
    type: Available
    - lastTransitionTime: '2023-08-30T03:52:16Z'
    lastUpdateTime: '2023-08-30T03:52:17Z'
    message: ReplicaSet "web-6f8fdd7f55" has successfully progressed.
    reason: NewReplicaSetAvailable
    status: 'True'
    type: Progressing
    observedGeneration: 1
    readyReplicas: 1
    replicas: 1
    updatedReplicas: 1

    ---
    apiVersion: v1
    kind: Service
    metadata:
    annotations: {}
    labels:
    k8s.kuboard.cn/name: web
    name: web
    namespace: exxk
    resourceVersion: '126824'
    spec:
    clusterIP: 10.233.80.181
    clusterIPs:
    - 10.233.80.181
    internalTrafficPolicy: Cluster
    ipFamilies:
    - IPv4
    ipFamilyPolicy: SingleStack
    ports:
    - name: gre3pw
    port: 80
    protocol: TCP
    targetPort: 80
    selector:
    k8s.kuboard.cn/name: web
    sessionAffinity: None
    type: ClusterIP
    status:
    loadBalancer: {}

    ---
    apiVersion: networking.k8s.io/v1
    kind: Ingress
    metadata:
    annotations: {}
    labels:
    k8s.kuboard.cn/name: web
    name: web
    namespace: exxk
    resourceVersion: '128138'
    spec:
    ingressClassName: myingresscontroller
    rules:
    - host: web.iexxk.io
    http:
    paths:
    - backend:
    service:
    name: web
    port:
    number: 80
    path: /
    pathType: Prefix
    status:
    loadBalancer:
    ingress:
    - ip: 172.16.3.165
  6. 额外,如果要不同域名对应不同的集群,nginx设置如下

    1
    2
    3
    4
    5
    6
    7
    8
    9
    10
    11
    12
    13
    14
    15
    16
    17
    18
    19
    20
    21
    22
    23
    24
    25
    26
    27
    28
    29
    30
    31
    32
    server {
    listen 80;
    server_name .iexxk.io;
    #access_log /var/log/nginx/hoddst.access.log main;

    location / {
    proxy_set_header Host $host;
    proxy_set_header X-Real-IP $remote_addr;
    proxy_set_header X-Forwarded-For $proxy_add_x_forwarded_for;
    proxy_pass http://172.16.3.165:32211/;
    }
    error_page 500 502 503 504 /50x.html;
    location = /50x.html {
    root /usr/share/nginx/html;
    }
    }
    server {
    listen 80;
    server_name .test.io;
    #access_log /var/log/nginx/hoddst.access.log main;

    location / {
    proxy_set_header Host $host;
    proxy_set_header X-Real-IP $remote_addr;
    proxy_set_header X-Forwarded-For $proxy_add_x_forwarded_for;
    proxy_pass http://172.16.3.160:32211/;
    }
    error_page 500 502 503 504 /50x.html;
    location = /50x.html {
    root /usr/share/nginx/html;
    }
    }

常见问题

  1. k8s节点ip发生变化,然后提示如下错误

    1
    2
    3
    4
    5
    6
    7
    [root@exxk gate3]# kubectl get pods
    E0511 15:13:07.676420 13114 memcache.go:265] couldn't get current server API group list: Get "https://127.0.0.1:6443/api?timeout=32s": dial tcp 127.0.0.1:6443: connect: connection refused
    E0511 15:13:07.676695 13114 memcache.go:265] couldn't get current server API group list: Get "https://127.0.0.1:6443/api?timeout=32s": dial tcp 127.0.0.1:6443: connect: connection refused
    E0511 15:13:07.678306 13114 memcache.go:265] couldn't get current server API group list: Get "https://127.0.0.1:6443/api?timeout=32s": dial tcp 127.0.0.1:6443: connect: connection refused
    E0511 15:13:07.679714 13114 memcache.go:265] couldn't get current server API group list: Get "https://127.0.0.1:6443/api?timeout=32s": dial tcp 127.0.0.1:6443: connect: connection refused
    E0511 15:13:07.680858 13114 memcache.go:265] couldn't get current server API group list: Get "https://127.0.0.1:6443/api?timeout=32s": dial tcp 127.0.0.1:6443: connect: connection refused
    The connection to the server 127.0.0.1:6443 was refused - did you specify the right host or port?

    解决:清理重装,参考https://zhuanlan.zhihu.com/p/621412584

  2. 重装后,出现错误container runtime network not ready: NetworkReady=false reason:NetworkPluginNotReady message:Network plugin returns error: cni plugin not initialized执行systemctl restart containerd.service

  3. kuboard启动报错,错误信息如下:

    1
    2
    3
    4
    5
    6
    7
    8
    9
    10
    11
    12
    13
    14
    15
    16
    17
    18
    19
    20
    21
    22
    23
    24
    25
    26
    27
    28
    29
    30
    31
    32
    33
    34
    kubectl logs kuboard-v3-master -n kuboard
    28 | error | 认证模块初始化失败:Get "http://127.0.0.1:5556/sso/.well-known/openid-configuration": dial tcp 127.0.0.1:5556: connect: connection refused
    panic: runtime error: invalid memory address or nil pointer dereference
    [signal SIGSEGV: segmentation violation code=0x1 addr=0x48 pc=0xd73477]

    goroutine 1 [running]:
    github.com/coreos/go-oidc.(*Provider).Verifier(...)
    /usr/src/kuboard/third-party/go-oidc/verify.go:111
    github.com/shaohq/kuboard/server/login.AddLoginRoutes(0xc000103ba0)
    /usr/src/kuboard/server/login/login.go:30 +0xf7
    main.getRoutes()
    /usr/src/kuboard/server/kuboard-server.go:193 +0x345
    main.main()
    /usr/src/kuboard/server/kuboard-server.go:65 +0x185

    启动 kuboard-server 失败,此问题通常是因为 Etcd 未能及时启动或者连接不上,系统将在 15 秒后重新尝试:
    1. 如果您使用 docker run 的方式运行 Kuboard,请耐心等候一会儿或者执行 docker restart kuboard;
    2. 如果您将 Kuboard 安装在 Kubernetes 中,请检查 kuboard/kuboard-etcd 是否正常启动。
    认证模块:使用本地用户库
    ...
    [LOG] 2024/12/04 - 16:46:30.352 | /common/etcd.client_config 24 | info | KUBOARD_ETCD_ENDPOINTS=[127.0.0.1:2379]
    [LOG] 2024/12/04 - 16:46:30.352 | /common/etcd.client_config 52 | info | {[127.0.0.1:2379] 0s 1s 0s 0s 0 0 <nil> false [] <nil> <nil> <nil> false}
    [LOG] 2024/12/04 - 16:46:30.353 | /initializekuboard.InitializeEtcd 39 | info | 初始化 ./init-etcd-scripts/audit-policy-once.yaml
    {"level":"warn","ts":"2024-12-04T16:46:32.313+0800","caller":"clientv3/retry_interceptor.go:61","msg":"retrying of unary invoker failed","target":"endpoint://client-ac1ea4fe-6b5e-43ba-8c9f-84931dbe782a/127.0.0.1:2379","attempt":0,"error":"rpc error: code = DeadlineExceeded desc = context deadline exceeded"}
    failed to initialize server: server: failed to list connector objects from storage: context deadline exceeded
    {"level":"info","ts":"2024-12-04T16:46:34.220+0800","caller":"etcdserver/server.go:469","msg":"recovered v3 backend from snapshot","backend-size-bytes":1955713024,"backend-size":"2.0 GB","backend-size-in-use-bytes":1955692544,"backend-size-in-use":"2.0 GB"}
    {"level":"info","ts":"2024-12-04T16:46:34.293+0800","caller":"etcdserver/raft.go:536","msg":"restarting local member","cluster-id":"f9f44c4ba0e96dd8","local-member-id":"59a9c584ea2c3f35","commit-index":5529395}
    {"level":"info","ts":"2024-12-04T16:46:34.293+0800","caller":"raft/raft.go:1530","msg":"59a9c584ea2c3f35 switched to configuration voters=(6460912315094810421)"}
    {"level":"info","ts":"2024-12-04T16:46:34.293+0800","caller":"raft/raft.go:700","msg":"59a9c584ea2c3f35 became follower at term 124"}
    {"level":"info","ts":"2024-12-04T16:46:34.294+0800","caller":"raft/raft.go:383","msg":"newRaft 59a9c584ea2c3f35 [peers: [59a9c584ea2c3f35], term: 124, commit: 5529395, applied: 5520552, lastindex: 5529395, lastterm: 124]"}
    {"level":"info","ts":"2024-12-04T16:46:34.294+0800","caller":"api/capability.go:76","msg":"enabled capabilities for version","cluster-version":"3.4"}
    {"level":"info","ts":"2024-12-04T16:46:34.294+0800","caller":"membership/cluster.go:256","msg":"recovered/added member from store","cluster-id":"f9f44c4ba0e96dd8","local-member-id":"59a9c584ea2c3f35","recovered-remote-peer-id":"59a9c584ea2c3f35","recovered-remote-peer-urls":["http://0.0.0.0:2380"]}
    {"level":"info","ts":"2024-12-04T16:46:34.294+0800","caller":"membership/cluster.go:269","msg":"set cluster version from store","cluster-version":"3.4"}
    {"level":"warn","ts":"2024-12-04T16:46:34.294+0800","caller":"auth/store.go:1366","msg":"simple token is not cryptographically signed"}

    解决:错误分析认证模块初始化失败应该可以忽略,后面会使用本地用户库进行认证,后面就是连接etcd,可能比较耗时,超过了启动探针时间,就认为启动失败了,因此修改启动探针时间即可。

    1
    2
    3
    4
    5
    6
    7
    8
    9
    10
    11
    12
    13
    #修改启动探针的时间,防止还没启动完就被终结了
    vim /etc/kubernetes/manifests/kuboard.yaml
    readinessProbe:
    failureThreshold: 3
    httpGet:
    path: /kuboard-resources/version.json
    port: 80
    scheme: HTTP
    initialDelaySeconds: 60 #原来是30s,修改为60s
    #进入容器
    kubectl exec -it kuboard-v3-master -n kuboard -- /bin/sh
    #手动执行,这一步会提示已经启动,应该不是重要的,重要的是修改启动探针时间
    etcd &

基础概念

  • o:organization(组织-公司)
  • ou:organization unit(组织单元-部门)
  • c:countryName(国家)
  • dc:domainComponent(域名)
  • sn:surname(姓氏)
  • cn:common name(常用名称)
  • dn:Distiguished Name(唯一标识名)
  • uid:User ID(用户标识)

安装

服务端安装osixia/docker-openldap

1
2
3
4
5
6
7
8
9
10
11
12
docker pull osixia/openldap:1.5.0
docker run \
-p 389:31236 \ #tcp
-p 636:636 \ #https
--volume /data/slapd/database:/var/lib/ldap \
--volume /data/slapd/config:/etc/ldap/slapd.d \
--env LDAP_ORGANISATION="exxk" \
--env LDAP_DOMAIN="exxktech.io" \
--env LDAP_ADMIN_PASSWORD="exxkTech@2023" \
--detach osixia/openldap:1.5.0


客户端安装工具

mac客户端管理工具Ldap Admin Tool

进去可以创建用户或组以及设置密码

测试demo

application.yml配置

1
2
3
4
5
6
spring:
ldap:
urls: ldap://172.1.1.44:31236
base: dc=iexxk,dc=io
username: cn=admin,dc=exxktech,dc=io
password: exxkTech@2023

Pom.xml添加依赖

1
2
3
4
5
6
7
8
9
<dependency>
<groupId>org.springframework.boot</groupId>
<artifactId>spring-boot-starter-data-ldap</artifactId>
</dependency>
<dependency>
<groupId>com.unboundid</groupId>
<artifactId>unboundid-ldapsdk</artifactId>
<scope>test</scope>
</dependency>

Customer.java

1
2
3
4
5
6
7
8
9
10
11
12
13
14
15
16
17
18
19
20
21
22
23
package com.exxk.ldaputil;

import org.springframework.ldap.odm.annotations.Attribute;
import org.springframework.ldap.odm.annotations.Entry;
import org.springframework.ldap.odm.annotations.Id;

import javax.naming.Name;

@Entry(base = "ou=customer,dc=exxktech,dc=io",objectClasses ="inetOrgPerson" )
public class Customer {
@Id
private Name id;
@Attribute(name = "cn")
private String userName;

@Override
public String toString() {
return "Customer{" +
"id=" + id +
", userName='" + userName + '\'' +
'}';
}
}

TestController.java

1
2
3
4
5
6
7
8
9
10
11
12
13
14
15
16
17
18
19
20
21
22
23
24
25
26
27
28
package com.exxk.ldaputil;

import org.springframework.beans.factory.annotation.Autowired;
import org.springframework.ldap.core.LdapTemplate;
import org.springframework.ldap.filter.EqualsFilter;
import org.springframework.ldap.query.LdapQuery;
import org.springframework.ldap.query.LdapQueryBuilder;
import org.springframework.web.bind.annotation.GetMapping;
import org.springframework.web.bind.annotation.RestController;

@RestController
public class TestController {
@Autowired
LdapTemplate ldapTemplate;

@GetMapping("/login")
public String compressVideo(String username,String password) {
String status="ok";
LdapQuery query= LdapQueryBuilder.query().where("cn").is(username);
Customer customer= ldapTemplate.findOne(query,Customer.class);
System.out.println("用户名"+customer.toString());
EqualsFilter filter = new EqualsFilter("cn", username);
if(!ldapTemplate.authenticate("", filter.toString(), password)){
status="用户密码错误!";
}
return status;
}
}

访问http://127.0.0.1:8080/login?username=lisi&password=111111进行测试

常见错误

  1. InvalidNmeException: [LDAP: error code 34 - invalid DN]] with root cause

    解决:spring.ldap.username的值从admin修改为cn=admin,dc=exxktech,dc=io

  1. 错误信息:

    1
    Failed to create pod sandbox: rpc error: code = DeadlineExceeded desc = failed to get sandbox image "k8s.gcr.io/pause:3.8": failed to pull image "k8s.gcr.io/pause:3.8": failed to pull and unpack image "k8s.gcr.io/pause:3.8": failed to resolve reference "k8s.gcr.io/pause:3.8": failed to do request: Head "https://k8s.gcr.io/v2/pause/manifests/3.8": dial tcp 74.125.23.82:443: i/o timeout

    原因:关键信息failed to pull image "k8s.gcr.io/pause:3.8",说明镜像拉取失败,因为k8s.gcr.io解析的都是国外ip。

    方案一(临时解决):

    1
    2
    3
    4
    5
    6
    7
    8
    #拉取镜像
    crictl pull registry.cn-hangzhou.aliyuncs.com/google_containers/pause:3.8
    #修改镜像名
    ctr -n k8s.io i tag registry.cn-hangzhou.aliyuncs.com/google_containers/pause:3.8 k8s.gcr.io/pause:3.8

    crictl pull registry.cn-hangzhou.aliyuncs.com/owater/cluster-proportional-autoscaler-amd64:1.8.3

    ctr -n k8s.io i tag registry.cn-hangzhou.aliyuncs.com/owater/cluster-proportional-autoscaler-amd64:1.8.3 k8s.gcr.io/cpa/cluster-proportional-autoscaler-amd64:1.8.5

    方案二(永久解决):

    1
    2
    3
    4
    5
    6
    vi /etc/containerd/config.toml
    #修改该行:sandbox_image = "k8s.gcr.io/pause:3.8"
    #为 :sandbox_image = "registry.cn-hangzhou.aliyuncs.com/google_containers/pause:3.8"
    systemctl daemon-reload
    systemctl restart containerd
    systemctl status containerd
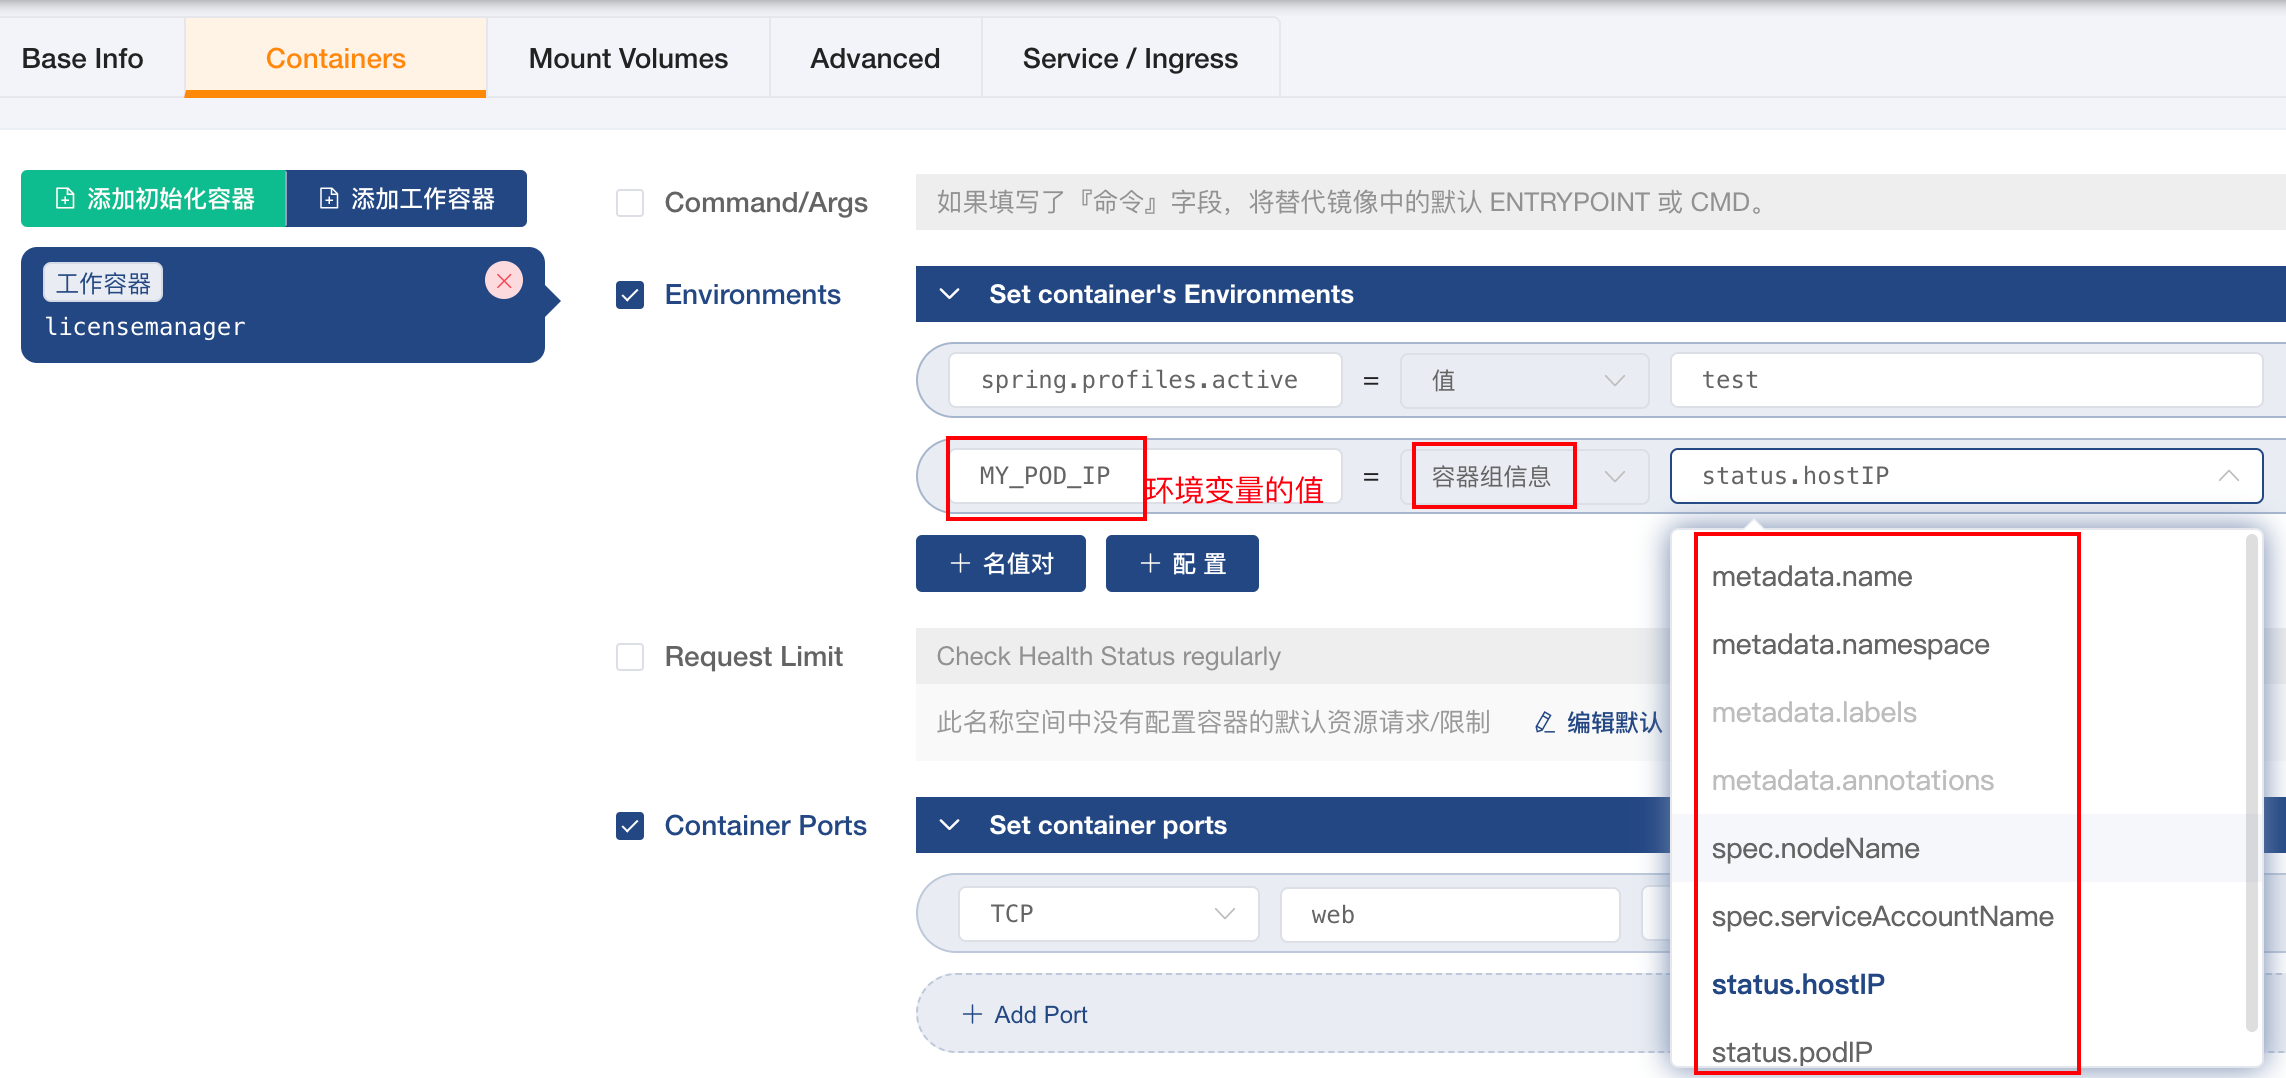
  2. 需求信息:获取k8s的节点ip

    原因:解决一些服务需要知道节点id

    解决:

    1
    2
    3
    4
    5
    6
    7
    8
    9
    10
    11
    spec:
    containers:
    - env:
    - name: spring.profiles.active
    value: test
    #增加如下配置
    - name: MY_POD_IP #MY_POD_IP是自定义的名字,可以修改
    valueFrom:
    fieldRef:
    apiVersion: v1
    fieldPath: status.hostIP

    对应的界面配置:

    pP2bQfA.png

    验证:在容器里面执行env就能看到MY_POD_IP的环境变量的值已经是宿主机的ip了

  3. 现象描述:三个节点,其中两个节点加nodeport能进行访问,其中一个节点加nodeport不能访问

    不能访问节点上的kube-proxy错误信息如下

    1
    2
    3
    4
    5
    6
    7
    8
    9
    10
    11
    [root@master ~]# kubectl get pods -n kube-system -o wide | grep kube-proxy
    kube-proxy-8xqxm 1/1 Running 2 (<invalid> ago) 5d21h 172.16.10.44 master <none> <none>
    kube-proxy-9nv9t 1/1 Running 2 (<invalid> ago) 5d21h 172.16.10.192 node-192 <none> <none>
    kube-proxy-m5swc 1/1 Running 1 (<invalid> ago) 5d6h 172.16.10.102 node-102 <none> <none>
    [root@master ~]# kubectl logs -n kube-system kube-proxy-8xqxm
    W0724 06:35:13.833247 1 reflector.go:424] vendor/k8s.io/client-go/informers/factory.go:150: failed to list *v1.Service: Unauthorized
    E0724 06:35:13.833277 1 reflector.go:140] vendor/k8s.io/client-go/informers/factory.go:150: Failed to watch *v1.Service: failed to list *v1.Service: Unauthorized
    W0724 06:35:31.199383 1 reflector.go:424] vendor/k8s.io/client-go/informers/factory.go:150: failed to list *v1.Node: Unauthorized
    E0724 06:35:31.199408 1 reflector.go:140] vendor/k8s.io/client-go/informers/factory.go:150: Failed to watch *v1.Node: failed to list *v1.Node: Unauthorized
    W0724 06:36:01.560044 1 reflector.go:424] vendor/k8s.io/client-go/informers/factory.go:150: failed to list *v1.EndpointSlice: Unauthorized
    E0724 06:36:01.560070 1 reflector.go:140] vendor/k8s.io/client-go/informers/factory.go:150: Failed to watch *v1.EndpointSlice: failed to list *v1.EndpointSlice: Unauthorized

    解决:删除kube-system kube-proxy-8xqxm这个,然后等他自动新建个这个服务就好了

常见问题

  1. 当一个镜像用于两个服务时,通过latest标签,只会更新成功一个,因此修改为指定版本号进行更新。

    分析:1. sh脚本'''三个单引号不支持环境变量,修改为三个双引号"""才支持。

    ​ 2. 相同镜像,两个服务通过重启,怀疑其中一个镜像还没拉取完但是检测到镜像版本已经是最新的了,因为另一个已经在执行了,就直接重启了。

    1
    2
    3
    4
    5
    6
    7
    sh """#!/bin/bash    
    curl -X PUT \
    -H "content-type: application/json" \
    -H "Cookie: KuboardUsername=admin; KuboardAccessKey=4xx" \
    -d '{"kind":"deployments","namespace":"base","name":"dev-system-business","images":{"harbor/business":"harbor/business:${env.gitlabMergeRequestTitle}"}}' \
    "http://172.1.1.44/kuboard-api/cluster/kubernates/kind/CICDApi/admin/resource/updateImageTag"
    """

环境信息:

软件 版本
Kubernetes 1.26.4
Kuboard 3.5.2.4
Jenkins 2.375.1
Harbor 2.0
Gitlab 10.0.0

后端

基础架构:

graph LR
A[gitlab合并] -->|通知| B(Jenkins编译)
B -->|1.push| D[harbor]
B -->|2.执行| E[kuboard重启项目负载]
D -->|完成后| E

详细步骤:

配置gitlab的webhook
  1. 点击项目Settings-->Integrations
  2. 输入URL,勾选jenkins里面的``Build when a change is pushed to GitLab. GitLab webhook URL: 可以拿到地址,eg: URL为http://172.1.1.24:8080/project/xxxdemo`
  3. 输入SecretToken,SecretToken为jenkins项目的Configure-->General-->Secret token-->generate生产的token,eg:035311df1e0bbedf1c1efb0cb5f5a630
  4. 只勾选Trigger触发方式Merge Request events,关闭其他包括SSL
  5. 点击Add webhook
配置Jenkins的configure
  1. 点击jenkins项目的configure-->General-->Build Triggers

  2. 勾选Build when a change is pushed to GitLab. GitLab webhook URL: http://172.1.1.24:8080/project/xxxdemo

    子集勾选:Accepted Merge Request Events

    Approved Merge Requests(EE-only)

    点击Advanced...

    其他不变,点击Generate生成Secret token

  3. 在Pipeline Script一栏,输入script脚本

    1
    2
    3
    4
    5
    6
    7
    8
    9
    10
    11
    12
    13
    14
    15
    16
    17
    18
    19
    20
    21
    22
    23
    24
    25
    26
    27
    28
    29
    30
    31
    32
    33
    34
    35
    36
    37
    38
    39
    40
    41
    42
    43
    44
    45
    46
    47
    48
    49
    50
    51
    52
    53
    54
    55
    56
    57
    58
    59
    60
    61
    62
    63
    64
    65
    66
    67
    68
    69
    70
    71
    72
    73
    74
    75
    76
    77
    78
    79
    80
    81
    82
    83
    84
    85
    86
    87
    88
    89
    90
    91
    92
    93
    94
    95
    96
    97
    98
    99
    100
    101
    102
    103
    104
    105
    106
    107
    108
    109
    110
    111
    112
    113
    114
    115
    116
    117
    118
    119
    120
    121
    122
    123
    124
    125
    126
    127
    128
    129
    130
    131
    132
    133
    134
    135
    136
    137
    138
    139
    140
    141
    142
    143
    144
    145
    146
    147
    148
    149
    150
    151
    152
    153
    154
    155
    156
    157
    158
    159
    160
    161
    162
    163
    164
    165
    166
    167
    168
    169
    170
    171
    172
    173
    174
    175
    176
    177
    178
    179
    180
    181
    182
    183
    184
    185
    186
    pipeline {
    agent any
    tools {
    jdk 'jdk8'
    dockerTool 'docker'
    }
    environment {
    GITLAB_API_URL = 'http://172.1.1.2:9999/api/v4'
    GITLAB_PROJECT_ID = '138'
    GITLAB_PRIVATE_TOKEN = 'Ny9ywkxxggjo9CwfuWMz'

    DOCKER_REGISTRY = 'harbor.exxktech.dev'
    DOCKER_REGISTRY_URL = 'http://harbor.exxktech.dev'
    DOCKER_REGISTRY_CREDENTIALS = 'c7da3fce-7e0c-415e-a684-e49e17560120'
    DOCKERFILE_PATH = 'src/main/docker'

    projectVersion = ''
    projectName = ''
    projectVersion1 = ''
    projectName1 = ''

    }
    stages {
    stage('Checkout') {
    steps {
    git branch: 'release',
    credentialsId: '123456',
    url: 'http://172.1.1.2:9999/exxk_backend_project/exxk_center.git'
    }
    }

    stage('maven build') {
    steps {
    script {
    sh 'mvn -Dmaven.test.failure.ignore=true clean install'
    }
    }
    }

    stage('multi build') {
    parallel {
    //项目一
    stage('exxk_center_manager') {
    stages {
    stage('docker build') {
    steps {
    dir('exxk_center_manager') {
    script {
    projectVersion = sh(script: 'mvn -f pom.xml help:evaluate -Dexpression=project.version -q -DforceStdout', returnStdout: true).trim()
    projectName = sh(script: 'mvn -f pom.xml help:evaluate -Dexpression=project.artifactId -q -DforceStdout', returnStdout: true).trim()
    // 执行Maven构建
    sh 'mvn -Dmaven.test.failure.ignore=true clean package dockerfile:build'
    }
    }
    }
    }
    stage('Docker tags') {
    steps {
    // 使用Docker插件构建和推送镜像
    script {
    def dockerImage = docker.image("${DOCKER_REGISTRY}/exxk_center/${projectName}:${projectVersion}")
    dockerImage.tag("${env.gitlabMergeRequestTitle}")
    }
    }
    }
    stage('Push Docker Image') {
    steps {
    // 使用Docker插件构建和推送镜像
    script {
    def dockerImage = docker.image("${DOCKER_REGISTRY}/exxk_center/${projectName}:${env.gitlabMergeRequestTitle}")
    withDockerRegistry(credentialsId: "${DOCKER_REGISTRY_CREDENTIALS}", toolName: 'docker', url: "${DOCKER_REGISTRY_URL}") {
    dockerImage.push()
    }
    }
    }
    }
    stage('Docker latest tags') {
    steps {
    // 使用Docker插件构建和推送镜像
    script {
    def dockerImage = docker.image("${DOCKER_REGISTRY}/exxk_center/${projectName}:${projectVersion}")
    dockerImage.tag("latest")
    }
    }
    }
    stage('Push latest Image') {
    steps {
    // 使用Docker插件构建和推送镜像
    script {
    def dockerImage = docker.image("${DOCKER_REGISTRY}/exxk_center/${projectName}:latest")
    withDockerRegistry(credentialsId: "${DOCKER_REGISTRY_CREDENTIALS}", toolName: 'docker', url: "${DOCKER_REGISTRY_URL}") {
    dockerImage.push()
    }
    }
    }
    }
    }
    post {
    success {
    script {
    sh '''#!/bin/bash
    curl -X PUT \
    -H "Content-Type: application/yaml" \
    -H "Cookie: KuboardUsername=admin; KuboardAccessKey=4ip7hrrs6ias.2npbn4kc546tdxb8ew58nsdyz37j7cby" \
    -d '{"kind":"deployments","namespace":"arts-center","name":"exxk-center-manager"}' \
    "http://172.1.1.44/kuboard-api/cluster/kubernates/kind/CICDApi/admin/resource/restartWorkload"
    '''
    }
    }
    }
    }
    //项目二
    stage('exxk_center_application') {
    stages {
    stage('docker build') {
    steps {
    dir('exxk_center_application') {
    script {
    projectVersion1 = sh(script: 'mvn -f pom.xml help:evaluate -Dexpression=project.version -q -DforceStdout', returnStdout: true).trim()
    projectName1 = sh(script: 'mvn -f pom.xml help:evaluate -Dexpression=project.artifactId -q -DforceStdout', returnStdout: true).trim()
    // 执行Maven构建
    sh 'mvn -Dmaven.test.failure.ignore=true clean package dockerfile:build'
    }
    }
    }
    }
    stage('Docker tags') {
    steps {
    // 使用Docker插件构建和推送镜像
    script {
    def dockerImage = docker.image("${DOCKER_REGISTRY}/exxk_center/${projectName1}:${projectVersion1}")
    dockerImage.tag("${env.gitlabMergeRequestTitle}")
    }
    }
    }
    stage('Push Docker Image') {
    steps {
    // 使用Docker插件构建和推送镜像
    script {
    def dockerImage = docker.image("${DOCKER_REGISTRY}/exxk_center/${projectName1}:${env.gitlabMergeRequestTitle}")
    withDockerRegistry(credentialsId: "${DOCKER_REGISTRY_CREDENTIALS}", toolName: 'docker', url: "${DOCKER_REGISTRY_URL}") {
    dockerImage.push()
    }
    }
    }
    }
    stage('Docker latest tags') {
    steps {
    // 使用Docker插件构建和推送镜像
    script {
    def dockerImage = docker.image("${DOCKER_REGISTRY}/exxk_center/${projectName1}:${projectVersion1}")
    dockerImage.tag("latest")
    }
    }
    }
    stage('Push latest Image') {
    steps {
    // 使用Docker插件构建和推送镜像
    script {
    def dockerImage = docker.image("${DOCKER_REGISTRY}/exxk_center/${projectName1}:latest")
    withDockerRegistry(credentialsId: "${DOCKER_REGISTRY_CREDENTIALS}", toolName: 'docker', url: "${DOCKER_REGISTRY_URL}") {
    dockerImage.push()
    }
    }
    }
    }
    }
    post {
    success {
    script {
    sh '''#!/bin/bash
    curl -X PUT \
    -H "Content-Type: application/yaml" \
    -H "Cookie: KuboardUsername=admin; KuboardAccessKey=4ip7hrrs6ias.xxxbn4kc546tdxb8ew58nsdyz37j7cby" \
    -d '{"kind":"deployments","namespace":"arts-center","name":"exxk-center-application"}' \
    "http://172.1.1.44/kuboard-api/cluster/kubernates/kind/CICDApi/admin/resource/restartWorkload"
    '''
    }
    }
    }
    }
    }
    }
    }
    }

    java项目配置

    文件结构

    1
    2
    3
    4
    5
    6
    7
    |-parent
    |-demo1
    |-src\main\docker\Dockerfile
    |-pom.xml
    |-demo2
    |-src\main\docker\Dockerfile
    |-pom.xml

    Dockerfile

    1
    2
    3
    4
    5
    6
    7
    8
    9
    10
    11
    12
    FROM harbor.exxktech.dev/base/java8:1.0.0

    ARG JAR_FILE
    ADD target/${JAR_FILE}.jar app.jar


    ENV JAVA_OPTS -Xms128m -Xmx256m
    ENV BOOT_PARAMS ""

    EXPOSE 8080

    ENTRYPOINT [ "sh", "-c", "java $JAVA_OPTS $JAVA_OPTS_AGENT -Djava.security.egd=file:/dev/./urandom -jar app.jar $BOOT_PARAMS" ]

    pom.xml

    1
    2
    3
    4
    5
    6
    7
    8
    9
    10
    11
    12
    13
    14
    15
    16
    17
    18
    19
    20
    21
    22
    23
    24
    25
    26
    <plugin>
    <groupId>com.spotify</groupId>
    <artifactId>dockerfile-maven-plugin</artifactId>
    <version>1.4.13</version>
    <executions>
    <execution>
    <id>default</id>
    <phase>none</phase>
    </execution>
    <execution>
    <id>after-deploy</id>
    <phase>deploy</phase>
    <goals>
    <goal>build</goal>
    </goals>
    </execution>
    </executions>
    <configuration>
    <repository>harbor.exxktech.dev/exxk_center/${project.name}</repository>
    <tag>${project.version}</tag>
    <buildArgs>
    <JAR_FILE>${project.build.finalName}</JAR_FILE>
    </buildArgs>
    <dockerfile>src/main/docker/Dockerfile</dockerfile>
    </configuration>
    </plugin>

微前端

架构

graph LR
A[gitlab前端项目1合并] -->|通知| B(Jenkins编译)
c[gitlab前端项目2合并] -->|通知| B(Jenkins编译)
B -->|1.push| D[harbor]
B -->|2.执行| E[kuboard重启项目负载]
D -->|完成后| E

配置

jenkins

1
2
3
4
5
6
7
8
9
10
11
12
13
14
15
16
17
18
19
20
21
22
23
24
25
26
27
28
29
30
31
32
33
34
35
36
37
38
39
40
41
42
43
44
45
46
47
48
49
50
51
52
53
54
55
56
57
58
59
60
61
62
63
64
65
66
67
68
69
70
71
72
73
74
75
76
77
78
79
80
81
82
83
84
85
86
87
88
89
90
91
92
93
94
95
96
97
98
99
100
pipeline {
agent any
tools {
dockerTool 'docker'
}
environment {
GITLAB_API_URL = 'http://172.1.1.25:9999/api/v4'
GITLAB_PROJECT_ID = '115'
GITLAB_PRIVATE_TOKEN = 'Ny9ywk6zggjo9CwfuWMz'

DOCKER_REGISTRY = 'harbor.exxktech.dev'
DOCKER_REGISTRY_URL= 'http://harbor.exxktech.dev'
DOCKER_REGISTRY_CREDENTIALS = 'c7da3fce-7e2c-415e-a684-e49e17560120'

NGINX_IMAGE = "nginx:latest"
IMAGE_NAME = 'harbor.exxktech.dev/art/web-art-center-main'
NGINX_CONFIG = 'default.conf'
}
stages {
stage('GitLab Checkout') {
steps {
dir('main') {
checkout([$class: 'GitSCM', branches: [[name: '*/release']], userRemoteConfigs: [[url: 'http://172.1.1.25:9999/exxk_frontend_project/performing-arts-center-system.git',credentialsId: 'e7a93679-a7f5-411f-823f-c3c5f467549b']]])
}
dir('sub') {
checkout([$class: 'GitSCM', branches: [[name: '*/release']], userRemoteConfigs: [[url: 'http://172.1.1.25:9999/exxk_frontend_project/performing-arts-center-business.git',credentialsId: 'e7a93679-a7f5-411f-823f-c3c5f467549b']]])
}
}
}
stage('Build') {
steps {
sh 'mkdir -p main_dist'
sh 'mkdir -p sub_dist'
// 构建前端项目,需要根据项目结构和使用的构建工具进行修改
sh 'cd main && yarn install && yarn build'
sh 'cd sub && yarn install && yarn build'
}
}

stage('Copy to Workspace') {
steps {
script {
// Copy dist contents to workspace's out directory
sh 'cp -r main/dist/* main_dist/'
sh 'cp -r sub/child/business/* sub_dist/'
sh 'cp main/Dockerfile .'
sh 'cp main/default.conf .'
}
}
}


stage('Build Image') {
steps {
script {
def dockerImage = docker.build("${IMAGE_NAME}:${env.gitlabMergeRequestTitle}")
withDockerRegistry(credentialsId: "${DOCKER_REGISTRY_CREDENTIALS}", toolName: 'docker', url: "${DOCKER_REGISTRY_URL}") {
dockerImage.push()
}
}
}
}

stage('Docker latest tags') {
steps {
// 使用Docker插件构建和推送镜像
script {
def dockerImage = docker.image("${IMAGE_NAME}:${env.gitlabMergeRequestTitle}")
dockerImage.tag("latest")
}
}
}
stage('Push latest Image') {
steps {
// 使用Docker插件构建和推送镜像
script {
def dockerImage = docker.image("${IMAGE_NAME}:latest")
withDockerRegistry(credentialsId: "${DOCKER_REGISTRY_CREDENTIALS}", toolName: 'docker', url: "${DOCKER_REGISTRY_URL}") {
dockerImage.push()
}
}
}

}

}
post {
success {
script {
sh '''#!/bin/bash
curl -X PUT \
-H "Content-Type: application/yaml" \
-H "Cookie: KuboardUsername=admin; KuboardAccessKey=4ip7hrrs6ias.2npbn4kc546tdxb8ew58nsdyz37j7cby" \
-d '{"kind":"deployments","namespace":"arts-center","name":"web-art-center"}' \
"http://172.1.1.44/kuboard-api/cluster/kubernates/kind/CICDApi/admin/resource/restartWorkload"
'''
}
}
}
}

Dockerfile

1
2
3
4
5
6
7
8
9
FROM nginx


RUN rm /etc/nginx/conf.d/default.conf

ADD default.conf /etc/nginx/conf.d/

COPY main_dist/ /usr/share/nginx/html/
COPY sub_dist/ /usr/share/nginx/html/child/busniess/

nginx default.conf

1
2
3
4
5
6
7
8
9
10
11
12
13
14
15
16
17
18
19
20
21
22
23
24
25
26
27
28
29
30
31
32
33
34
35
36
37
38
39
40
# 后端接口代理地址
upstream api_server {
server deduction-center-manager:8555;
}
server {
listen 80;
server_name localhost;
underscores_in_headers on;

location / {
root /usr/share/nginx/html;
index index.html index.htm;
try_files $uri $uri/ /index.html =404;
}

location /child/busniess {
root html;
index index.html index.htm;
#try_files $uri $uri/ /child/busniess/index.html;
}

location /manager/api/ {
rewrite ~/manager/api/(.*)$ /$1 break;
proxy_pass http://api_server/manager/api/;
proxy_set_header Host $host;
proxy_pass_request_headers on;
proxy_set_header X-Real-IP $remote_addr;
proxy_set_header X-Forwarded-For $proxy_add_x_forwarded_for;
proxy_read_timeout 300;
proxy_send_timeout 300;
}


error_page 500 502 503 504 /50x.html;

location = /50x.html {
root html;
}
}

问题现象:

在给Legion Y7000P IAH7联想电脑本来带的win11系统再加装一个CentOS-7-x86_64-Minimal-2009.iso的时候发现没有wifi驱动,无法连接网络,切换装ubuntu系统,也是没有wifi驱动。

1
2
3
4
5
6
7
8
9
10
11
12
13
14
15
16
17
18
19
20
21
22
[root@exxk ~]# lspci -v #查看无线设备,驱动相关信息,发现没有驱动
00:14.3 Network controller: Intel Corporation Device 51f0 (rev 01)
Subsystem: Intel Corporation Device 0094
Flags: fast devsel, IRQ 16
Memory at 410317c000 (64-bit, non-prefetchable) [size=16K]
Capabilities: [c8] Power Management version 3
Capabilities: [d0] MSI: Enable- Count=1/1 Maskable- 64bit+
Capabilities: [40] Express Root Complex Integrated Endpoint, MSI 00
Capabilities: [80] MSI-X: Enable- Count=16 Masked-
Capabilities: [100] Latency Tolerance Reporting
Capabilities: [164] Vendor Specific Information: ID=0010 Rev=0 Len=014 <?>
Kernel modules: iwlwifi
[root@exxk ~]# dmesg | grep iwlwifi
[ 32.584961] iwlwifi 0000:00:14.3: enabling device (0000 -> 0002)
[ 32.588729] iwlwifi 0000:00:14.3: firmware: failed to load iwlwifi-so-a0-gf-a0-72.ucode (-2)
[ 32.588794] iwlwifi 0000:00:14.3: firmware: failed to load iwlwifi-so-a0-gf-a0-72.ucode (-2)
[ 32.588840] iwlwifi 0000:00:14.3: Direct firmware load for iwlwifi-so-a0-gf-a0-72.ucode failed with error -2
......
[ 32.634708] iwlwifi 0000:00:14.3: Direct firmware load for iwlwifi-so-a0-gf-a0-39.ucode failed with error -2
[ 32.634709] iwlwifi 0000:00:14.3: minimum version required: iwlwifi-so-a0-gf-a0-39
[ 32.635165] iwlwifi 0000:00:14.3: maximum version supported: iwlwifi-so-a0-gf-a0-72
[ 32.635644] iwlwifi 0000:00:14.3: check git://git.kernel.org/pub/scm/linux/kernel/git/firmware/linux-firmware.git

尝试解决:

  1. 下载英特尔® Wi-Fi 6 AX210 160MHz驱动**(改驱动不起作用)**

    本来电脑是AX211驱动,但是官网没有211的Linux驱动,但是在官网发现AX211驱动和AX210的驱动在win11系统下是一样的,因此尝试用210的Linux驱动安装。

  2. 根据AX210的Linux驱动要求内核5.10+,因此先升级内核

    下载内核

    kernel-ml-6.4.11-1.el7.elrepo.x86_64.rpm

    kernel-ml-devel-6.4.11-1.el7.elrepo.x86_64.rpm

    1
    2
    3
    cp kernel* ~/rpm
    cd ~/rpm
    rpm -Uvh --force --nodeps *

    后续步骤见之前的文章:centos7.3升级内核

    升级内核后无法通过有线网卡上网,切换旧的内核,执行

    1
    2
    3
    4
    5
    6
    7
    8
    9
    10
    11
    12
    13
    14
    15
    16
    17
    18
    19
    20
    21
    22
    23
    24
    25
    26
    # 安装
    yum -y install pciutils
    #执行
    lspci -v
    # 最后一行可以看到
    31:00.0 Ethernet controller: Realtek Semiconductor Co., Ltd. RTL8111/8168/8411 PCI Express Gigabit Ethernet Controller (rev 15)
    Subsystem: Lenovo Device 3938
    Flags: bus master, fast devsel, latency 0, IRQ 17
    I/O ports at 3000 [size=256]
    Memory at 5c204000 (64-bit, non-prefetchable) [size=4K]
    Memory at 5c200000 (64-bit, non-prefetchable) [size=16K]
    Capabilities: [40] Power Management version 3
    Capabilities: [50] MSI: Enable- Count=1/1 Maskable- 64bit+
    Capabilities: [70] Express Endpoint, MSI 01
    Capabilities: [b0] MSI-X: Enable+ Count=4 Masked-
    Capabilities: [100] Advanced Error Reporting
    Capabilities: [140] Virtual Channel
    Capabilities: [160] Device Serial Number 01-00-00-00-68-4c-e0-00
    Capabilities: [170] Latency Tolerance Reporting
    Capabilities: [178] L1 PM Substates
    Kernel driver in use: r8169
    Kernel modules: r8169
    # 切换为 CentOS Linux (6.4.11-1.el7.elrepo.x86_64) 7 (Core)可以看到没有加载驱动,最后少了Kernel driver in use: r8169这一行
    rmmode r8169 #需要先移除才能加载成功
    modprobe r8169 #加载驱动成功就可以上网了,重启就会失效,需要重新执行这两个命令
    # 持久加载:如果您希望在每次系统启动时自动加载驱动程序,您可以将其添加到 /etc/modules 文件中。打开该文件并在末尾添加一行,写入您的驱动程序名称。保存文件后,下次系统启动时,该驱动程序将自动加载。
  3. 解压tar -zxvf iwlwifi-ty-59.601f3a66.0.tgz

  4. 安装驱动,执行cp *.ucode /lib/firmware

  5. 重启,执行reboot

  6. 配置网络nmtui

  7. vi /etc/systemd/logind.conf 去掉HandleLidSwitch前面的注释符号#,并把它的值从suspend修改为ignore,执行systemctl restart systemd-logind生效

方案一(成功解决):

内核相关依赖https://git.kernel.org/pub/scm/linux/kernel/git/firmware/linux-firmware.git/在里面找个最新的[ linux-firmware-20230804.tar.gz](https://git.kernel.org/pub/scm/linux/kernel/git/firmware/linux-firmware.git/snapshot/linux-firmware-20230804.tar.gz) (sig)

1
2
3
4
5
6
7
8
9
10
11
12
13
14
15
16
wget https://git.kernel.org/pub/scm/linux/kernel/git/firmware/linux-firmware.git/snapshot/linux-firmware-20230804.tar.gz
tar -xzvf linux-firmware-20230804.tar.gz
cd linux-firmware-20230804
# 全部同意Y
cp iwlwifi-* /lib/firmware
reboot
nmtui
# 备份系统
tar cvpzf backup.tgz / --exclude=/proc --exclude=/lost+found --exclude=/mnt --exclude=/sys --exclude=backup.tgz --waring=no-file-changed
# 还原
tar xvpfz backup.tgz -C /
mkdir proc
mkdir lost+found
mkdir mnt
mkdir sys
restorecon -Rv /

方案二:网卡驱动冲突

1
2
3
4
5
6
#查看PCI设备(网卡、声卡、显卡、磁盘控制器、USB 控制器等)信息
lspci |grep -i network
# lspci commond not found
yum -y install pciutils
# 进入对应设备目录,删除多余版本的固件文件
cd /lib/firmware/ath10k/<网卡名字>/<硬件版本>/

方案三:centos 配置无线网卡centos7无线网卡

1
2
3
4
5
6
7
8
#查看无线网卡是否安装
lspci | grep Wireless
#查找驱动
yum search kmod-wl
#安装驱动
yum install kmod-wl
#启用无线网卡
nmcli radio wifi on

参考:

https://community.intel.com/t5/Wireless/AX211-wifi-does-not-work-on-Debian-Bullseye-Linux-kernel-6-NUC/td-p/1465779

centos 7 笔记本闭盖不休眠

CentOS7 内核升级失败处理办法

  1. 创建harbor项目(已有项目可以忽略)

    pPeou38.png

  2. 查看推送命令,得到镜像名称格式harbor.xxxtech.dev/backend/REPOSITORY[:TAG]

    pPmvTDx.png

  3. 配置hos映射,将harbor.xxxtech.dev域名映射到172.16.10.49 主机上(后期域名可直接访问省略这一步)

  4. 打包java项目,构建docker镜像,执行命令docker build --no-cache=true -f [Dockerfile的路径] -t harbor.xxxtech.dev/backend/[项目名]:[TAG] [指定目录构建]

    Eg: docker build --no-cache=true -f docker/Dockerfile -t harbor.xxxtech.dev/backend/licensemanager:1.0 .

    pPmvj8H.png

  5. 推送镜像到Harbor。

    1
    2
    3
    4
    5
    6
    #修改 Docker daemon的配置文件,添加如下配置
    "insecure-registries": [ "harbor.xxxtech.dev" ]
    #根据提示输入用户名和密码
    docker login harbor.xxxtech.dev
    #推送镜像
    docker push harbor.xxxtech.dev/backend/licensemanager:1.0

    pPmvxxA.png

  6. 登录kuboard创建命名空间(存在可以忽略该步骤)

    pPmx9qP.png

  7. 配置harbor仓库(已配置可以忽略该步骤)

    输入docker server:http://harbor.xxxtech.dev

    输入docker username:对应harbor的用户名

    输入docker password:对应harbor的密码

    pPmxnrq.png

  8. 开始部署项目,创建Deployment

    pPmxtMR.png

    设置工作负载名称,副本数默认1即可,生产按需进行增加副本

    pPmxgsI.png

    添加工作容器

    可选:添加两个健康检查接口/actuator/health/liveness/actuator/health/readiness

    pPmxoWQ.png

    配置访问地址ingress
    pPmxXwV.png

    pPmzCl9.png

  9. 配置nginx进行访问(这一步有公共nginx可以省略)

    运行nginx:docker run --name xxx-nginx -v /Users/xuanleung/xxx/nginx.conf:/etc/nginx/conf.d/default.conf:ro -p 80:80 -d nginx

    1
    2
    3
    4
    5
    6
    7
    8
    9
    10
    11
    12
    13
    14
    15
    16
    server {
    listen 80;
    server_name .xxxtech.io;
    #access_log /var/log/nginx/hoddst.access.log main;

    location / {
    proxy_set_header Host $host;
    proxy_set_header X-Real-IP $remote_addr;
    proxy_set_header X-Forwarded-For $proxy_add_x_forwarded_for;
    proxy_pass http://172.16.10.44:31407/;
    }
    error_page 500 502 503 504 /50x.html;
    location = /50x.html {
    root /usr/share/nginx/html;
    }
    }

    在host添加域名映射:127.0.0.1 licensmanager.xxxtech.io

    最后访问http://licensmanager.xxxtech.io即可