cause: io/netty/bootstrap/ServerBootstrap at com.alibaba.dubbo.rpc.protocol.dubbo.DubboProtocol.createServer(DubboProtocol.java:287)[dubbo-2.6.6.jar:2.6.6]
java.lang.IllegalArgumentException: Specified invalid port from env value:0 at com.alibaba.dubbo.config.ServiceConfig.parsePort(ServiceConfig.java:691) ~[dubbo-2.6.6.jar:2.6.6]
解决:环境变量设置有问题,在vm上覆写参数-DDUBBO_PORT_TO_BIND=20880
异常信息
1
2
failed to connect to server /10.0.0.54:20880, error message is:connection timed out: /10.0.0.54:20880
	at com.alibaba.dubbo.remoting.transport.netty4.NettyClient.doConnect(NettyClient.java:127) ~[dubbo-2.6.6.jar:2.6.6]
c.c.b.s.w.a.GlobalExceptionHandler : application error
com.alibaba.dubbo.rpc.RpcException: No provider available from registry 192.168.240.15:2181 for service cn.com.api.dubbo.service.TestDubboService:1.0.0 on consumer 10.233.73.69 use dubbo version 2.6.6, please check status of providers(disabled, not registered or in blacklist).
at com.alibaba.dubbo.registry.integration.RegistryDirectory.doList(RegistryDirectory.java:590)
ERRO[16:03:26 CST] Failed to exec command: sudo -E /bin/sh -c "/usr/local/bin/kubectl -n kubesphere-monitoring-system create secret generic kube-etcd-client-certs --from-file=etcd-client-ca.crt=/etc/ssl/etcd/ssl/ca.pem --from-file=etcd-client.crt=/etc/ssl/etcd/ssl/node-k8s-etcd-242.14.pem --from-file=etcd-client.key=/etc/ssl/etcd/ssl/node-k8s-etcd-242.14-key.pem"
error: error reading /etc/ssl/etcd/ssl/node-k8s-etcd-242.14.pem: no such file or directory: Process exited with status 1  node=10.255.242.10
[upload-certs] Storing the certificates in Secret "kubeadm-certs" in the "kube-system" Namespace
error execution phase upload-certs: error uploading certs: error creating token: timed out waiting for the condition
....
Failed to get cluster status: Failed to upload kubeadm certs: Failed to exec command: sudo -E /bin/sh -c "/usr/local/bin/kubeadm init phase upload-certs --upload-certs"
helm部署的时候push报如下错误Error: UPGRADE FAILED: pre-upgrade hooks failed: unable to build kubernetes object for deleting hook appchart-uat/templates/alertReceiver.yaml: unable to recognize "": no matches for kind "Receiver" in version "notification.kubesphere.io/v2beta2"
# Deploy CRDs and the Notification Manager Operator:
kubectl apply -f https://github.com/kubesphere/notification-manager/releases/download/v2.0.1/bundle.yaml
# Deploy default template:
kubectl apply -f https://github.com/kubesphere/notification-manager/releases/download/v2.0.1/template.yaml
# Deploy built-in language packs.
kubectl apply -f https://github.com/kubesphere/notification-manager/releases/download/v2.0.1/zh-cn.yaml
删除log组件之后,提示no endpoints available for service ":ks-apiserver:"具体错误找不到了,大概是9443端口连接不上
解决:同第五个问题
流水线错误:Error: UPGRADE FAILED: pre-upgrade hooks failed: receivers.notification.kubesphere.io "-webhook-receiver" is forbidden: User "xxx" cannot delete resource "receivers" in API group
解决:xxx用户没有集群的权限,修改为有权限的用户kubeconfig
原因:会根据xxx用户的集群凭证去创建CRD,但是被拒绝了。
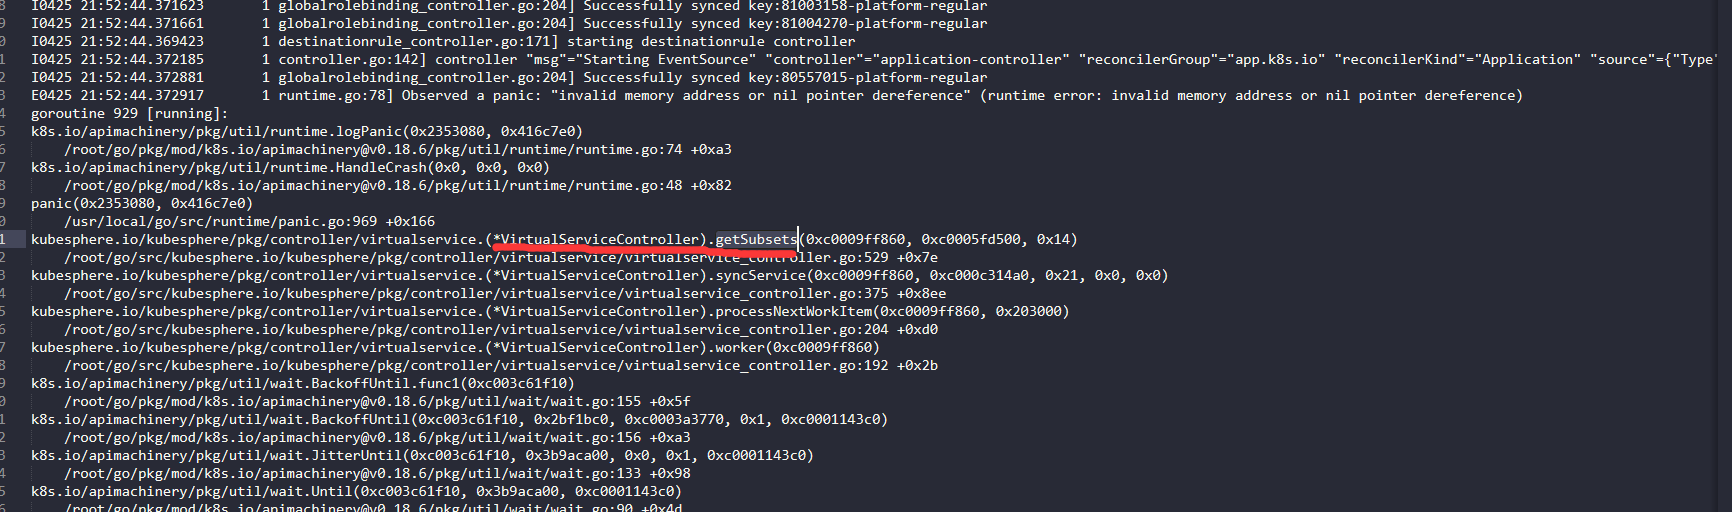
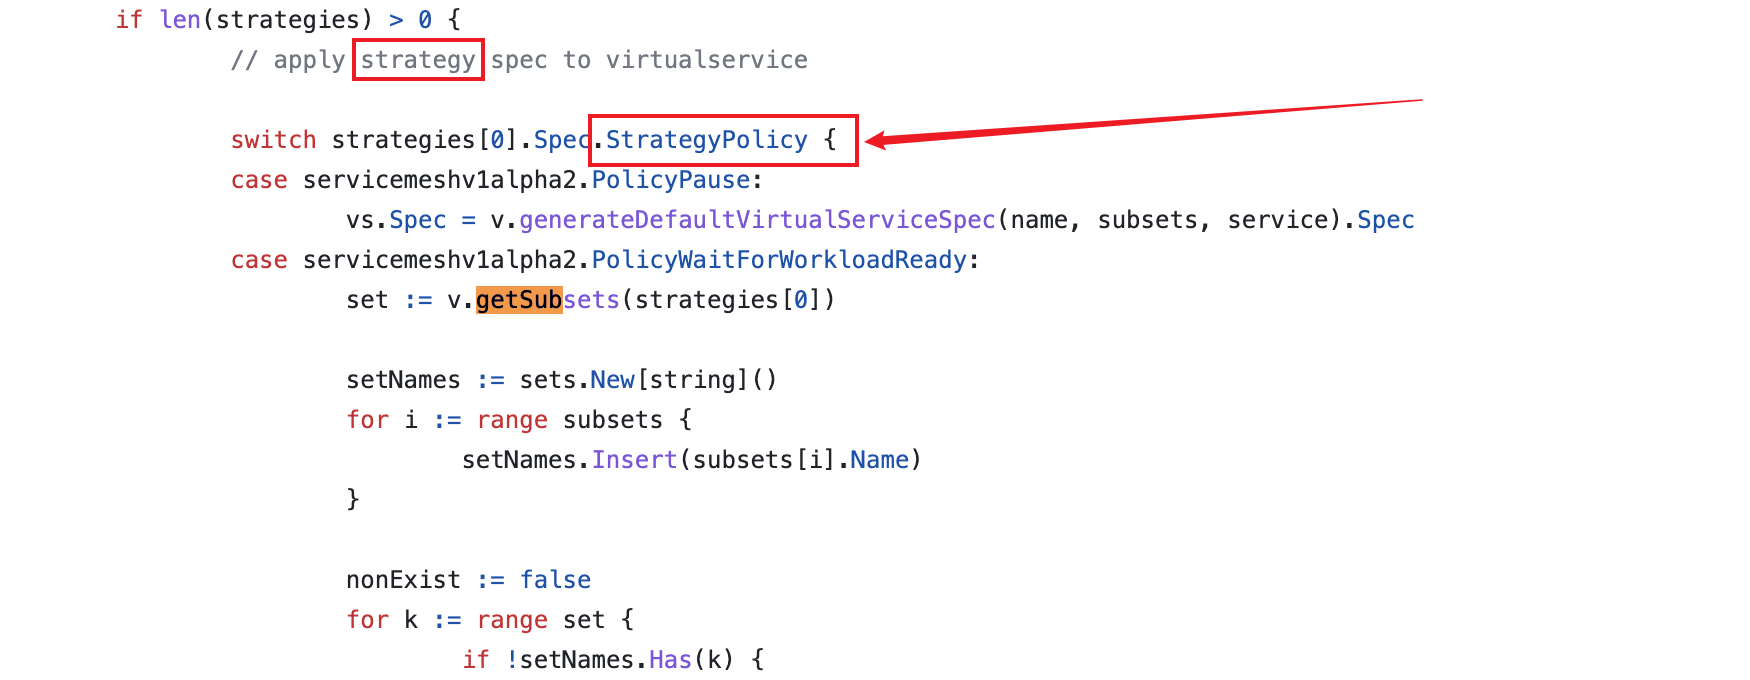
ks-controller-manager部署启动报错,不断重启,错误信息如下:
关键错误信息:E0425 16:45:32.489641 1 runtime.go:78] Observed a panic: "invalid memory address or nil pointer dereference" (runtime error: invalid memory address or nil pointer dereference)
#创建部署
kubectl create deployment test --image=nginx:latest
#获取部署信息
kubectl get deployments
#获取集群节点
kubectl get nodes
#获取容器组
kubectl get pods --all-namespaces
#获取服务
kubectl get service --all-namespaces